By: Team CS2113-AY1819S1-W13-2 Since: Aug 2018 Licence: MIT
- 1. Context
- 2. Setting up
- 3. Design
- 4. Implementation
- 4.1. Undo/Redo feature
- 4.2. Looking Up Dive Tables For Pressure Groups
- 4.3. Consistency checks for
DiveSessionobjects during Creation/Update - 4.4. Calculating Pressure Groups
- 4.5. New Feature: Planning Mode (with
portovercapability) - 4.6. Sorting of data
- 4.7. New Parameters & conditions in a DiveSession
- 4.8. Localized Units
- 4.9. Colour coding of the Pressure Groups
- 4.10. Logging
- 4.11. Configuration
- 5. Documentation
- 6. Testing
- 7. Dev Ops
- Appendix A: Product Scope
- Appendix B: User Stories
- Appendix C: Use Cases
- Appendix D: Non Functional Requirements
- Appendix E: Glossary
- Appendix F: Product Survey
- Appendix G: Instructions for Manual Testing
1. Context
When a diver goes on a dive, the pressure underwater causes nitrogen to build up in the blood stream. When the diver returns to the surface, he or she has that level of nitrogen in his or her blood. However, due to the atmospheric pressure being lower than underwater, the partial pressure of nitrogen is different. Having too much nitrogen build up can be dangerous particularly if you are planning a second dive or going on a flight as the nitrogen can form bubbles inside one’s bloodstream. In order to solve this problem, divers manually calculate their “pressure groups”. The pressure groups are on a range from A, B, C all the way to Z. Depending on your pressure group you can attempt your next dive. It is generally advised to avoid ending a dive with a pressure group of "W", "X", "Y", and "Z" or you would need to have a minimum surface interval of one hour if you end with "W" or "X", and three hours if you end with "Y" or "Z". Before attempting your next dive, you have to plan your dive first! You want to dive to 15 metres for half an hour after your pressure group from your first dive is D. Are you sure it’s safe to do so? Use our Divelog to find out!
2. Setting up
2.1. Prerequisites
-
JDK
9or laterJDK 10on Windows will fail to run tests in headless mode due to a JavaFX bug. Windows developers are highly recommended to use JDK9. -
IntelliJ IDE
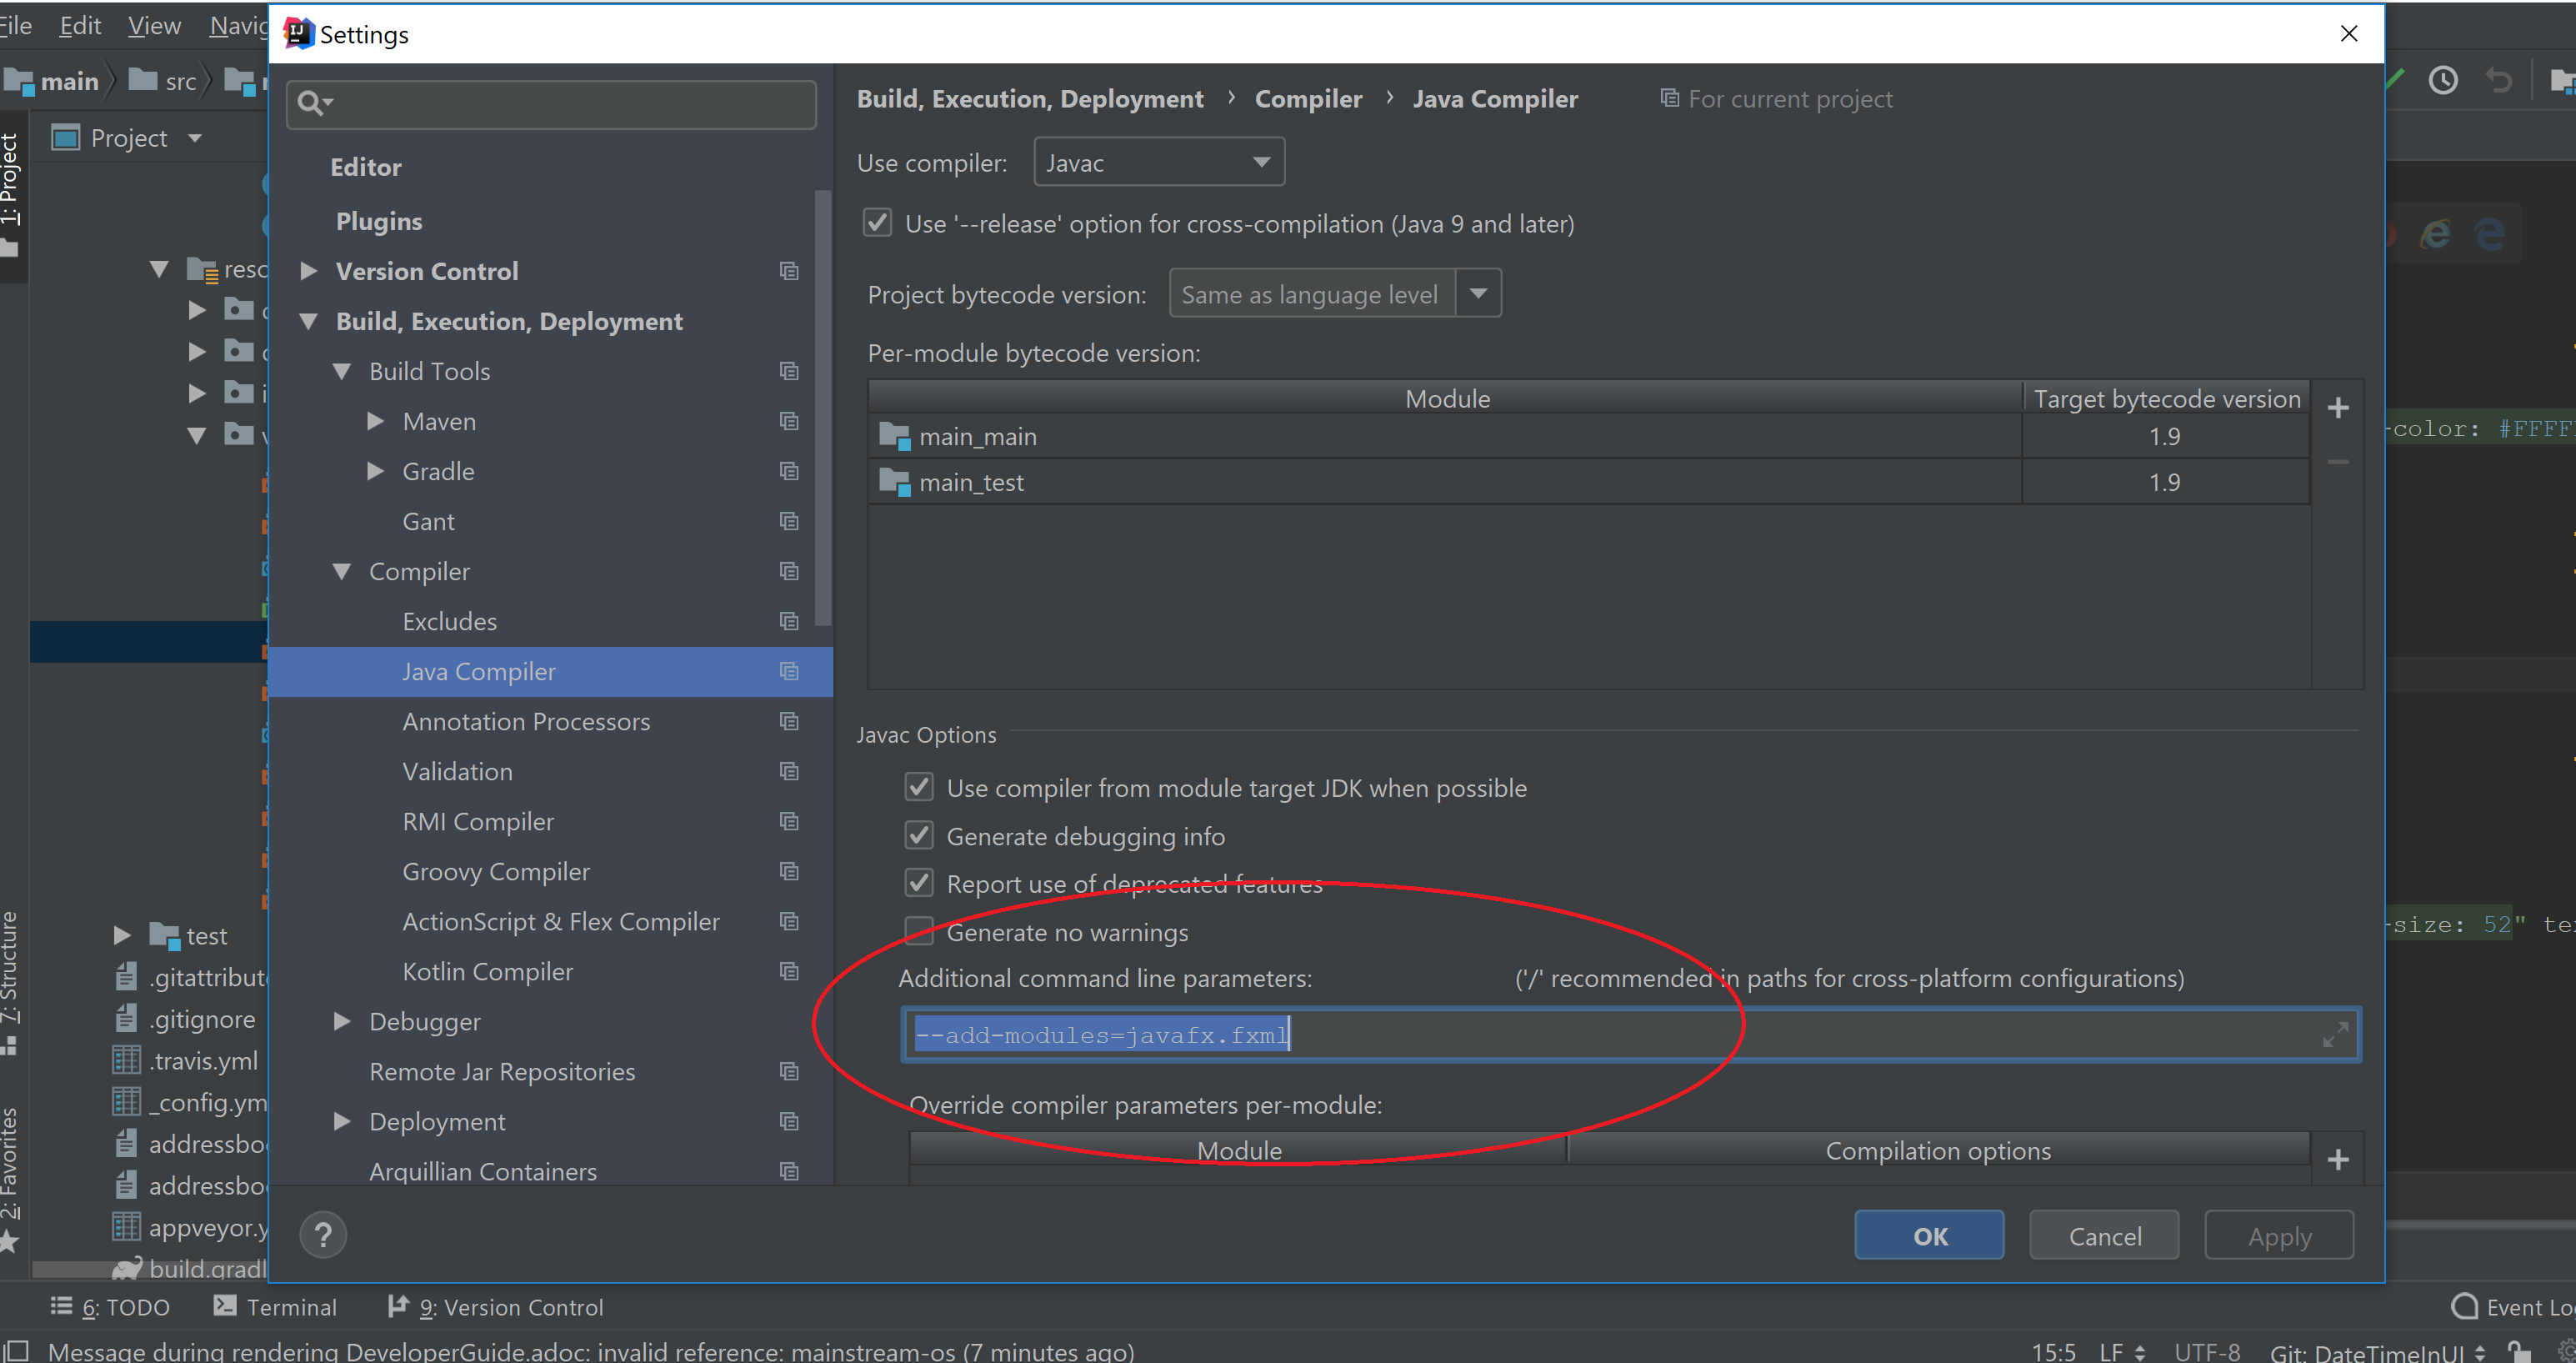
IntelliJ by default has Gradle and JavaFx plugins installed.
Do not disable them. If you have disabled them, go toFile>Settings>Pluginsto re-enable them. If there is still error after enabling them, you will need to go toFile>Settings>Build, Execution, Deployment>Compiler>Java Compiler>Javac optionsand add the following:--add-modules=javafx.fxml. This is illustrated by the diagram below.
2.2. Setting up the project in your computer
-
Fork this repo, and clone the fork to your computer
-
Open IntelliJ (if you are not in the welcome screen, click
File>Close Projectto close the existing project dialog first) -
Set up the correct JDK version for Gradle
-
Click
Configure>Project Defaults>Project Structure -
Click
New…and find the directory of the JDK
-
-
Click
Import Project -
Locate the
build.gradlefile and select it. ClickOK -
Click
Open as Project -
Click
OKto accept the default settings -
Open a console and run the command
gradlew processResources(Mac/Linux:./gradlew processResources). It should finish with theBUILD SUCCESSFULmessage.
This will generate all resources required by the application and tests.
2.3. Verifying the setup
-
Run the
seedu.divelog.MainAppand try a few commands -
Run the tests to ensure they all pass.
2.4. Configurations to do before writing code
2.4.1. Configuring the coding style
This project follows oss-generic coding standards. IntelliJ’s default style is mostly compliant with ours but it uses a different import order from ours. To rectify,
-
Go to
File>Settings…(Windows/Linux), orIntelliJ IDEA>Preferences…(macOS) -
Select
Editor>Code Style>Java -
Click on the
Importstab to set the order-
For
Class count to use import with '*'andNames count to use static import with '*': Set to999to prevent IntelliJ from contracting the import statements -
For
Import Layout: The order isimport static all other imports,import java.*,import javax.*,import org.*,import com.*,import all other imports. Add a<blank line>between eachimport
-
Optionally, you can follow the UsingCheckstyle.adoc document to configure Intellij to check style-compliance as you write code.
2.4.2. Updating documentation to match your fork
After forking the repo, the documentation will still have the SE-EDU branding and refer to the se-edu/addressbook-level4 repo.
If you plan to develop this fork as a separate product (i.e. instead of contributing to se-edu/addressbook-level4), you should do the following:
-
Configure the site-wide documentation settings in
build.gradle, such as thesite-name, to suit your own project. -
Replace the URL in the attribute
repoURLinDeveloperGuide.adocandUserGuide.adocwith the URL of your fork.
2.4.3. Setting up CI
Set up Travis to perform Continuous Integration (CI) for your fork. See UsingTravis.adoc to learn how to set it up.
After setting up Travis, you can optionally set up coverage reporting for your team fork (see UsingCoveralls.adoc).
| Coverage reporting could be useful for a team repository that hosts the final version but it is not that useful for your personal fork. |
Optionally, you can set up AppVeyor as a second CI (see UsingAppVeyor.adoc).
| Having both Travis and AppVeyor ensures your App works on both Unix-based platforms and Windows-based platforms (Travis is Unix-based and AppVeyor is Windows-based) |
2.4.4. Getting started with coding
When you are ready to start coding,
-
Get some sense of the overall design by reading Section 3.1, “Architecture”.
-
Take a look at [GetStartedProgramming].
3. Design
3.1. Architecture
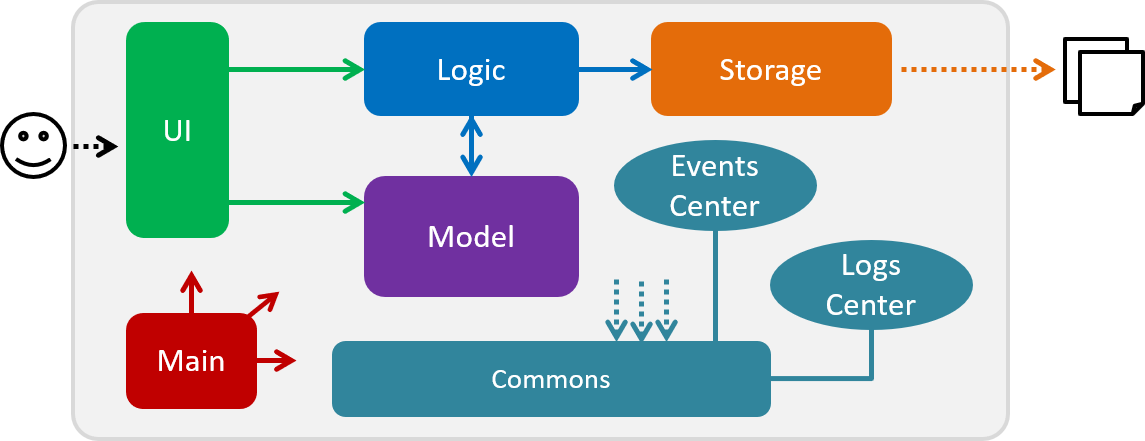
The Architecture Diagram given above explains the high-level design of the App. Given below is a quick overview of each component.
The .pptx files used to create diagrams in this document can be found in the diagrams folder. To update a diagram, modify the diagram in the pptx file, select the objects of the diagram, and choose Save as picture.
|
Main has only one class called MainApp. It is responsible for,
-
At app launch: Initializes the components in the correct sequence, and connects them up with each other.
-
At shut down: Shuts down the components and invokes cleanup method where necessary.
Commons represents a collection of classes used by multiple other components. Two of those classes play important roles at the architecture level.
-
EventsCenter: This class (written using Google’s Event Bus library) is used by components to communicate with other components using events (i.e. a form of Event Driven design) -
LogsCenter: Used by many classes to write log messages to the App’s log file.
The rest of the App consists of four components.
Each of the four components
-
Defines its API in an
interfacewith the same name as the Component. -
Exposes its functionality using a
{Component Name}Managerclass.
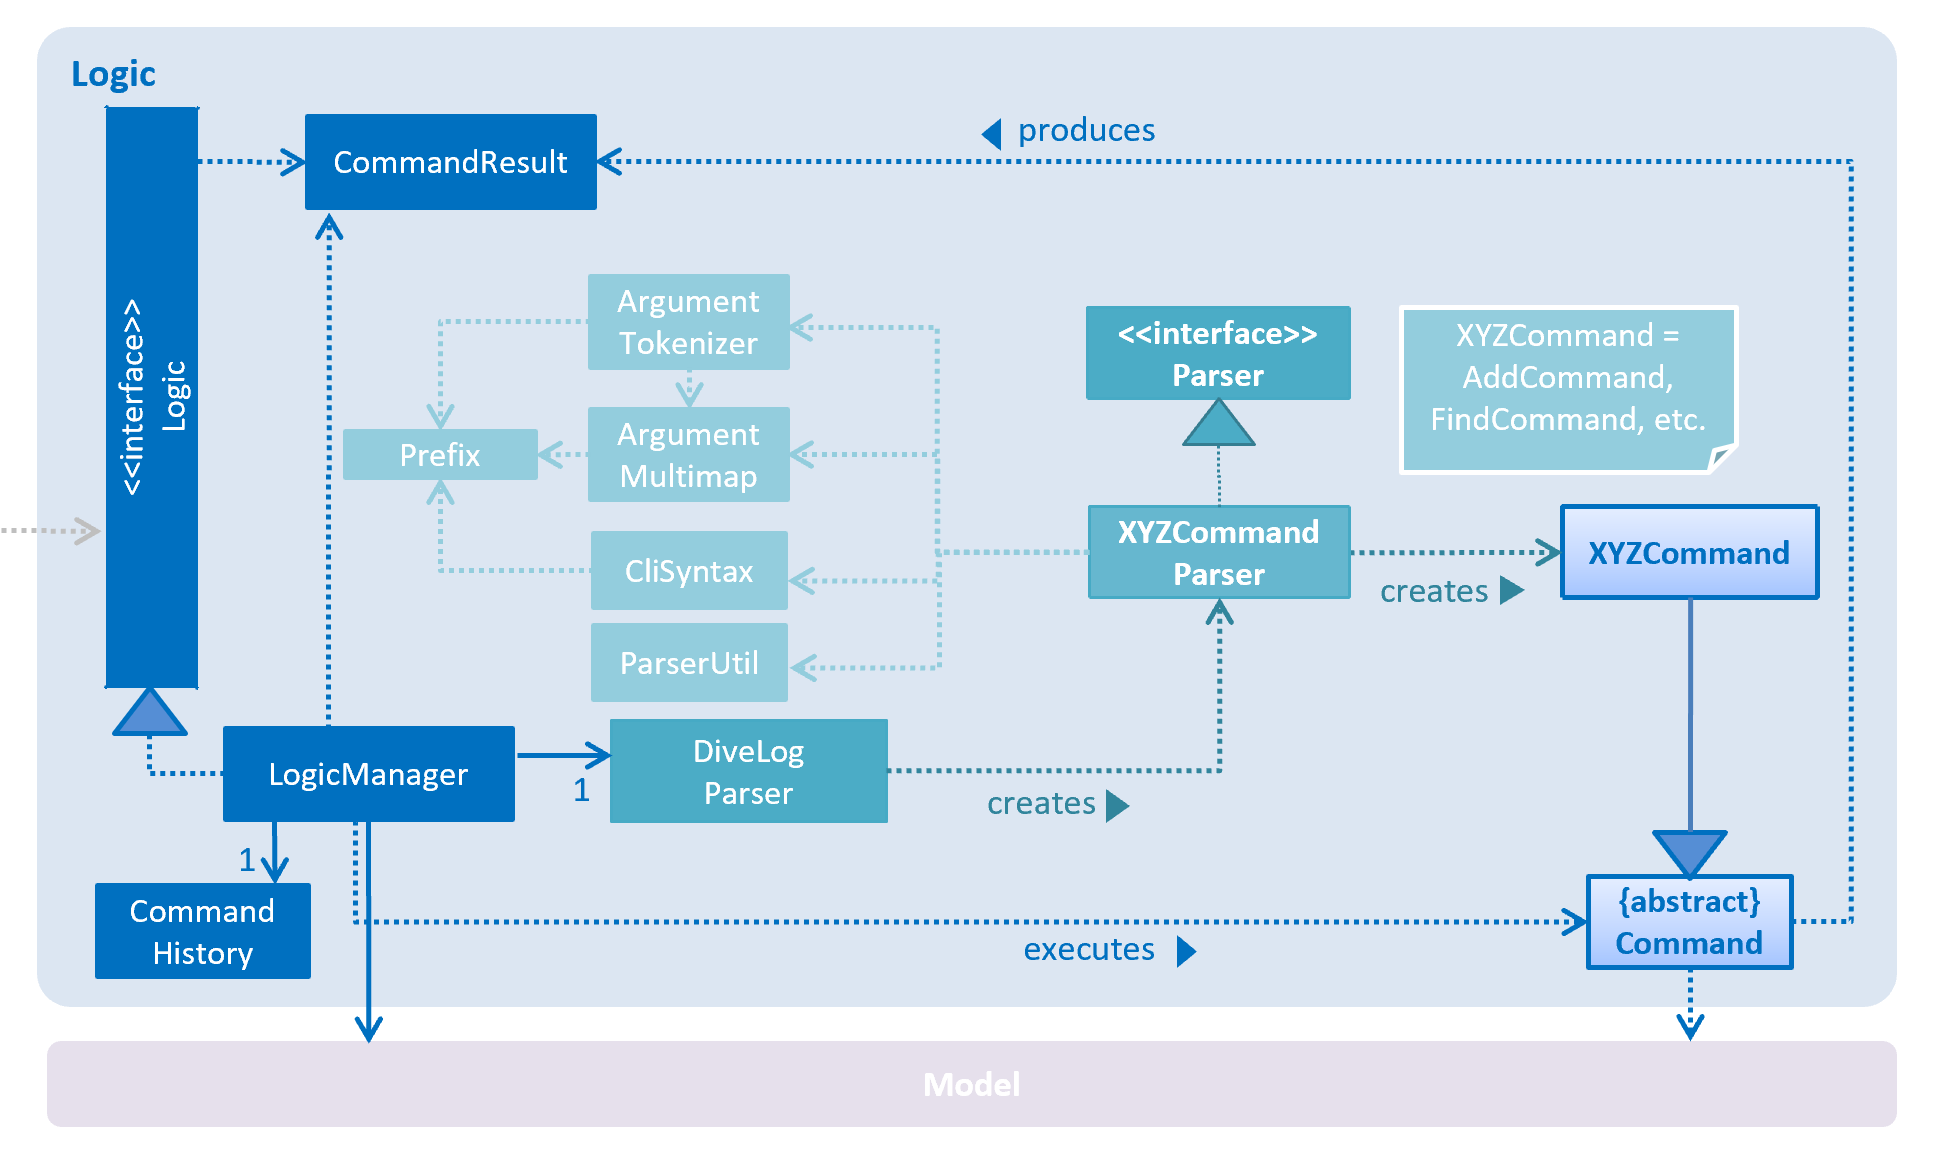
For example, the Logic component (see the class diagram given below) defines it’s API in the Logic.java interface and exposes its functionality using the LogicManager.java class.
Events-Driven nature of the design
The Sequence Diagram below shows how the components interact for the scenario where the user issues the command delete 1.
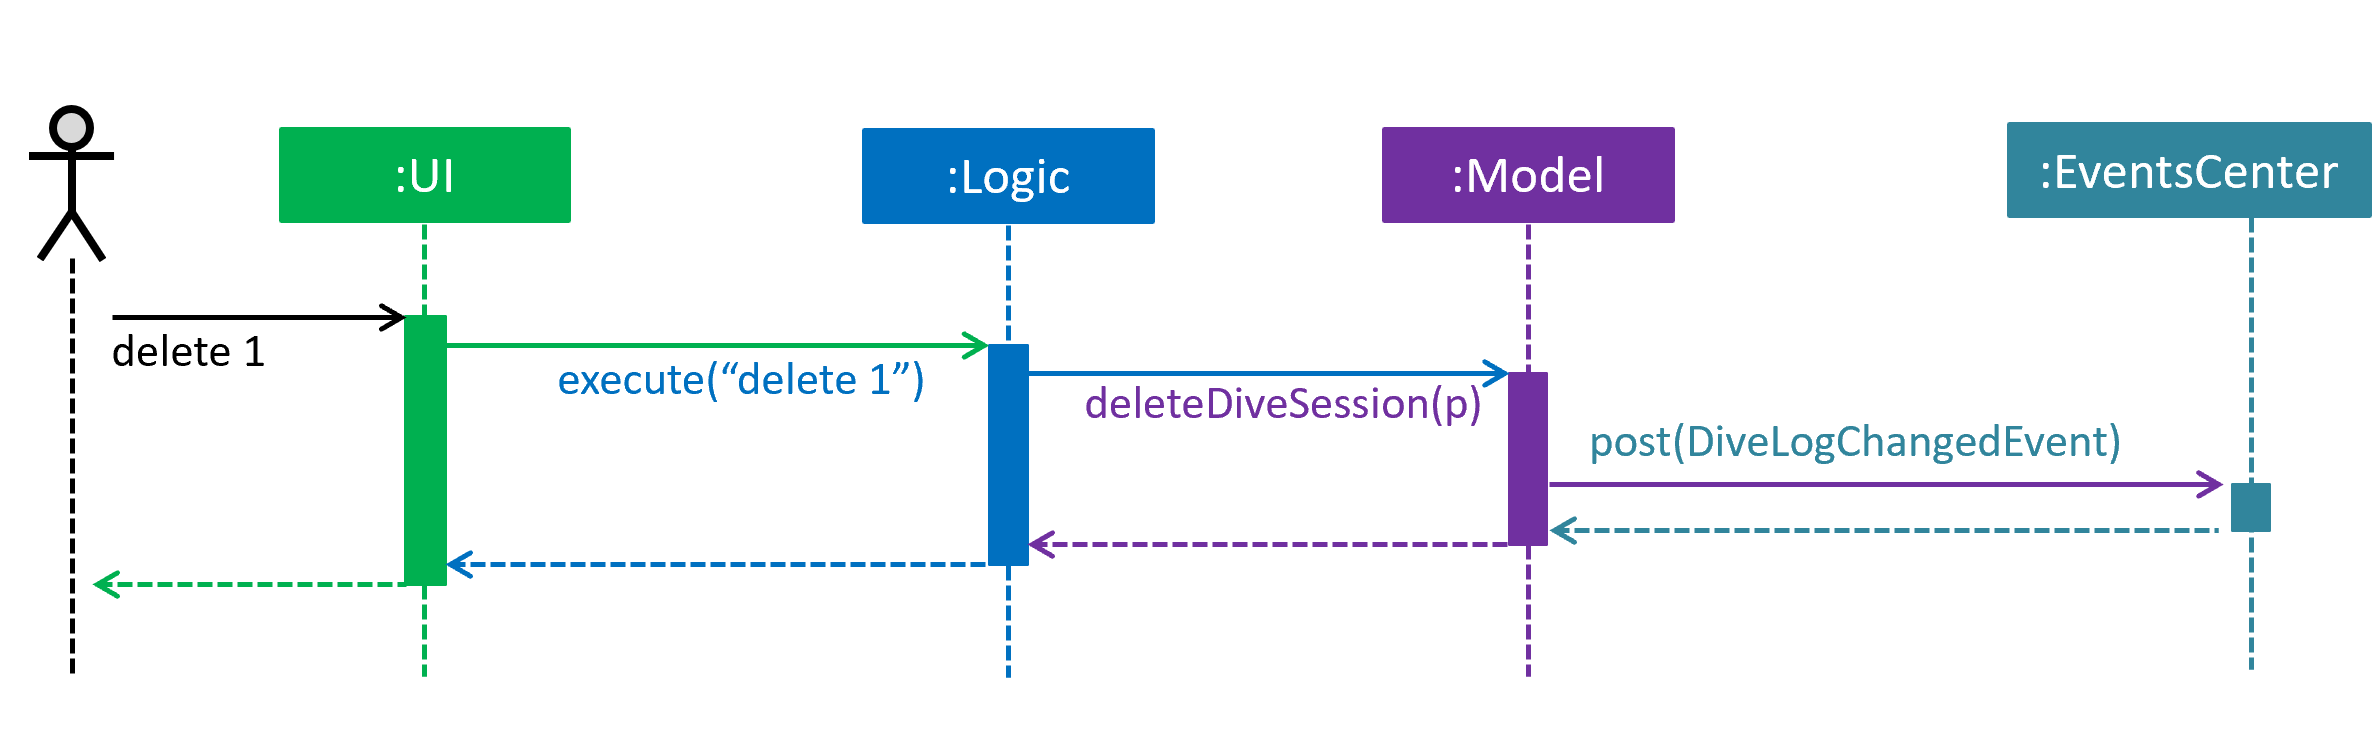
delete 1 command (part 1)
Note how the Model simply raises a DiveLogChangedEvent when the Dive Session data are changed, instead of asking the Storage to save the updates to the hard disk.
|
The diagram below shows how the EventsCenter reacts to that event, which eventually results in the updates being saved to the hard disk and the status bar of the UI being updated to reflect the 'Last Updated' time.
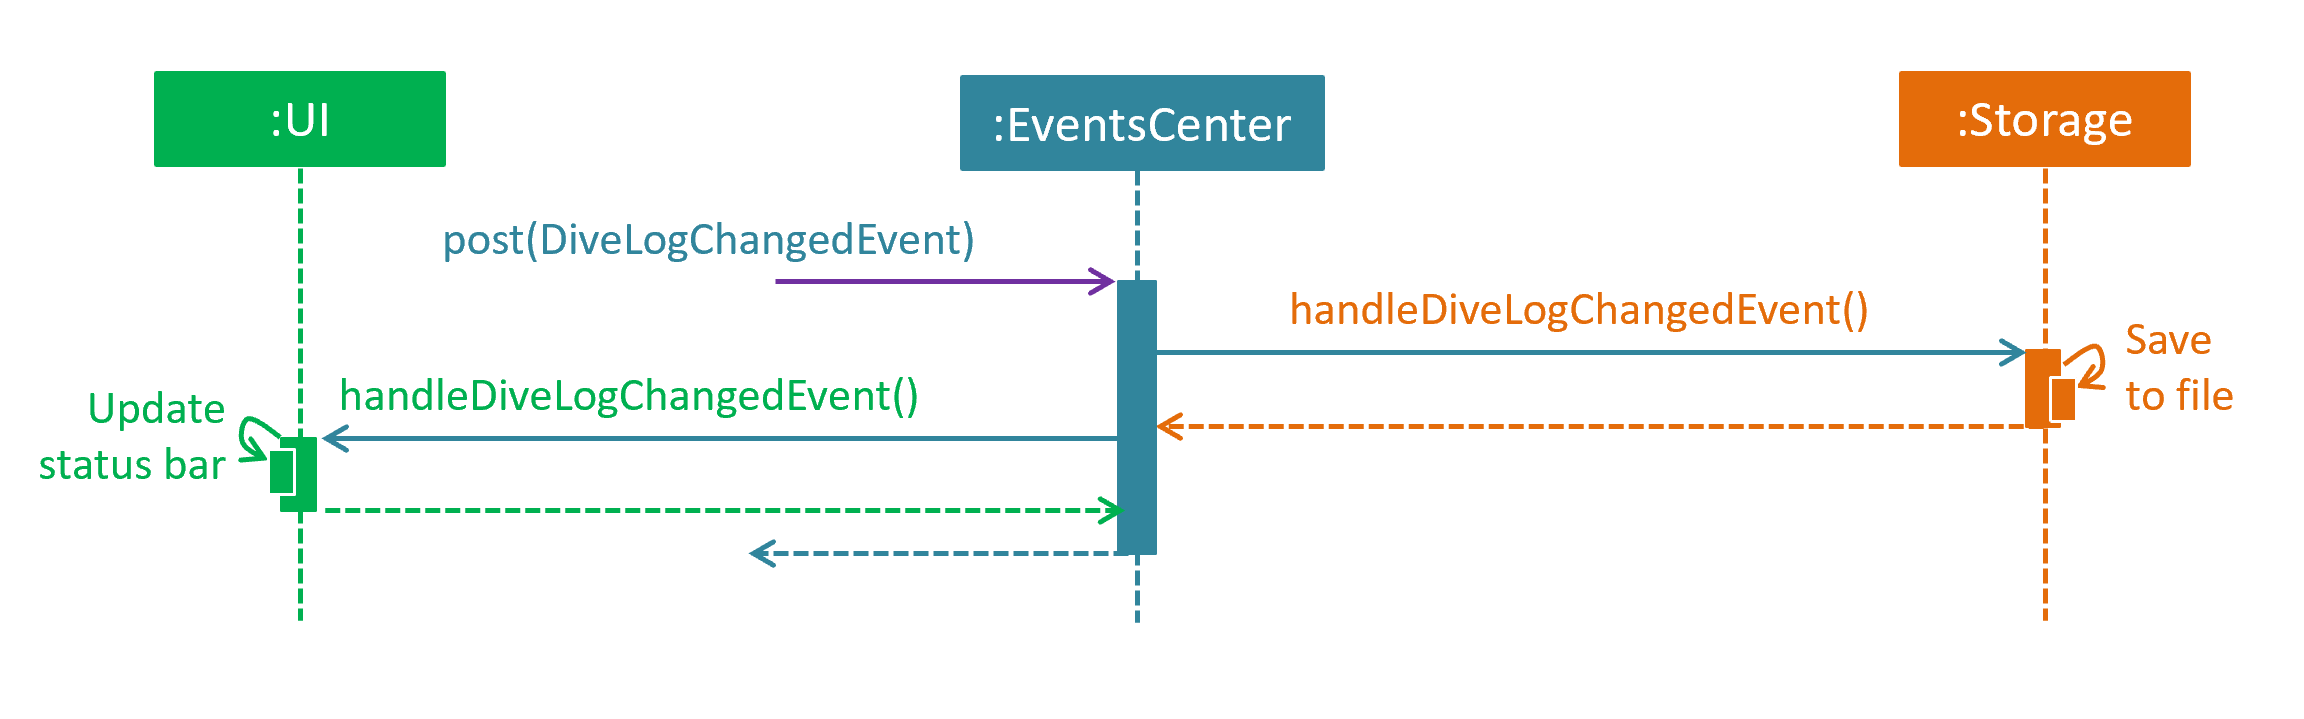
delete 1 command (part 2)
Note how the event is propagated through the EventsCenter to the Storage and UI without Model having to be coupled to either of them. This is an example of how this Event Driven approach helps us reduce direct coupling between components.
|
The sections below give more details of each component.
3.2. UI component
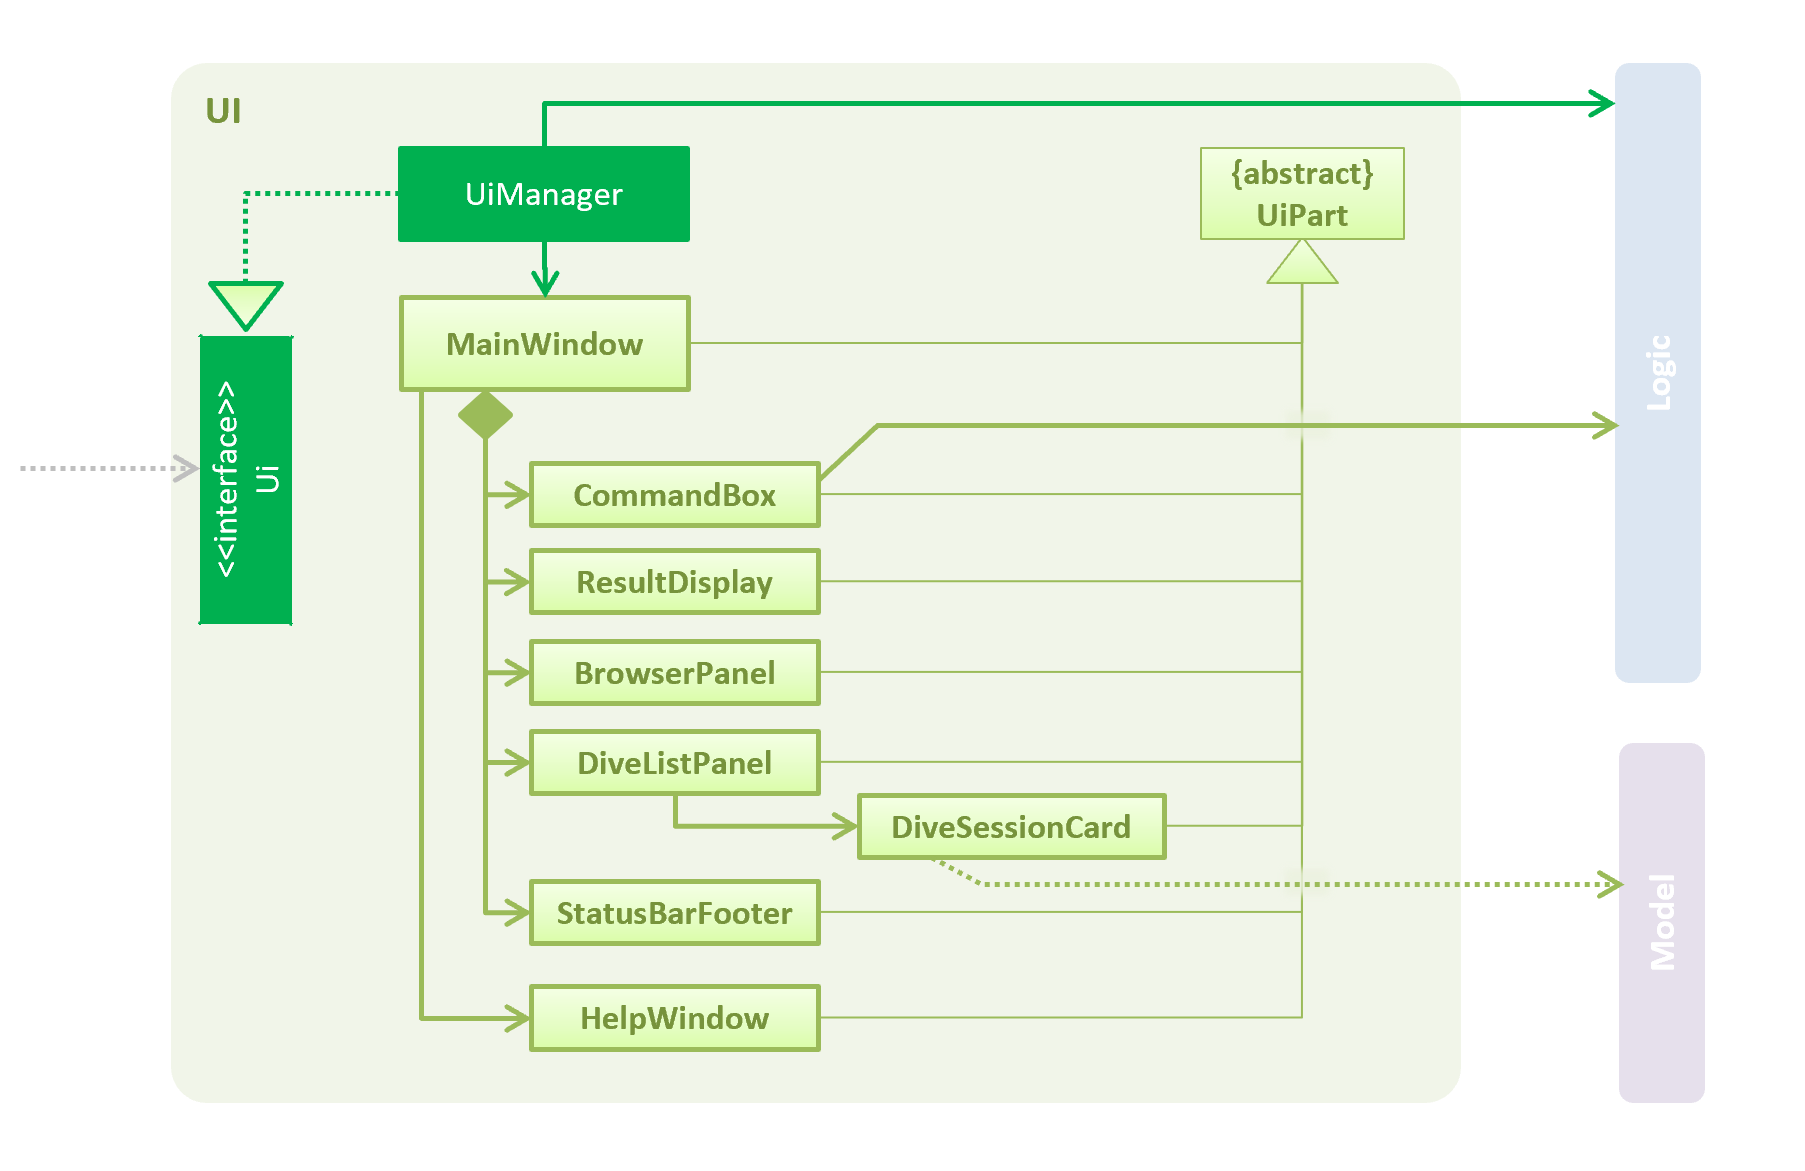
API : Ui.java
The UI consists of a MainWindow that is made up of parts e.g.CommandBox, ResultDisplay, DiveListPanel, StatusBarFooter, BrowserPanel etc. All these, including the MainWindow, inherit from the abstract UiPart class.
The UI component uses JavaFx UI framework. The layout of these UI parts are defined in matching .fxml files that are in the src/main/resources/view folder. For example, the layout of the MainWindow is specified in MainWindow.fxml
The UI component,
-
Executes user commands using the
Logiccomponent. -
Binds itself to the data in the
Modelso that the UI can auto-update when data in theModelchange. -
Responds to events raised from various parts of the App and updates the UI accordingly.
Some of the choices here was choosing the type of placeholders to use like labels etc to store the data. Eventually it boiled down to the nature of the data and how it was to be displayed at the end of the day.
3.3. Logic component
API :
Logic.java
-
Logicuses theDiveLogParserclass to parse the user command. -
This results in a
Commandobject which is executed by theLogicManager. -
The command execution can affect the
Model(e.g. adding a diveSession) and/or raise events. -
The result of the command execution is encapsulated as a
CommandResultobject which is passed back to theUi.
Given below is the Sequence Diagram for interactions within the Logic component for the execute("delete 1") API call.
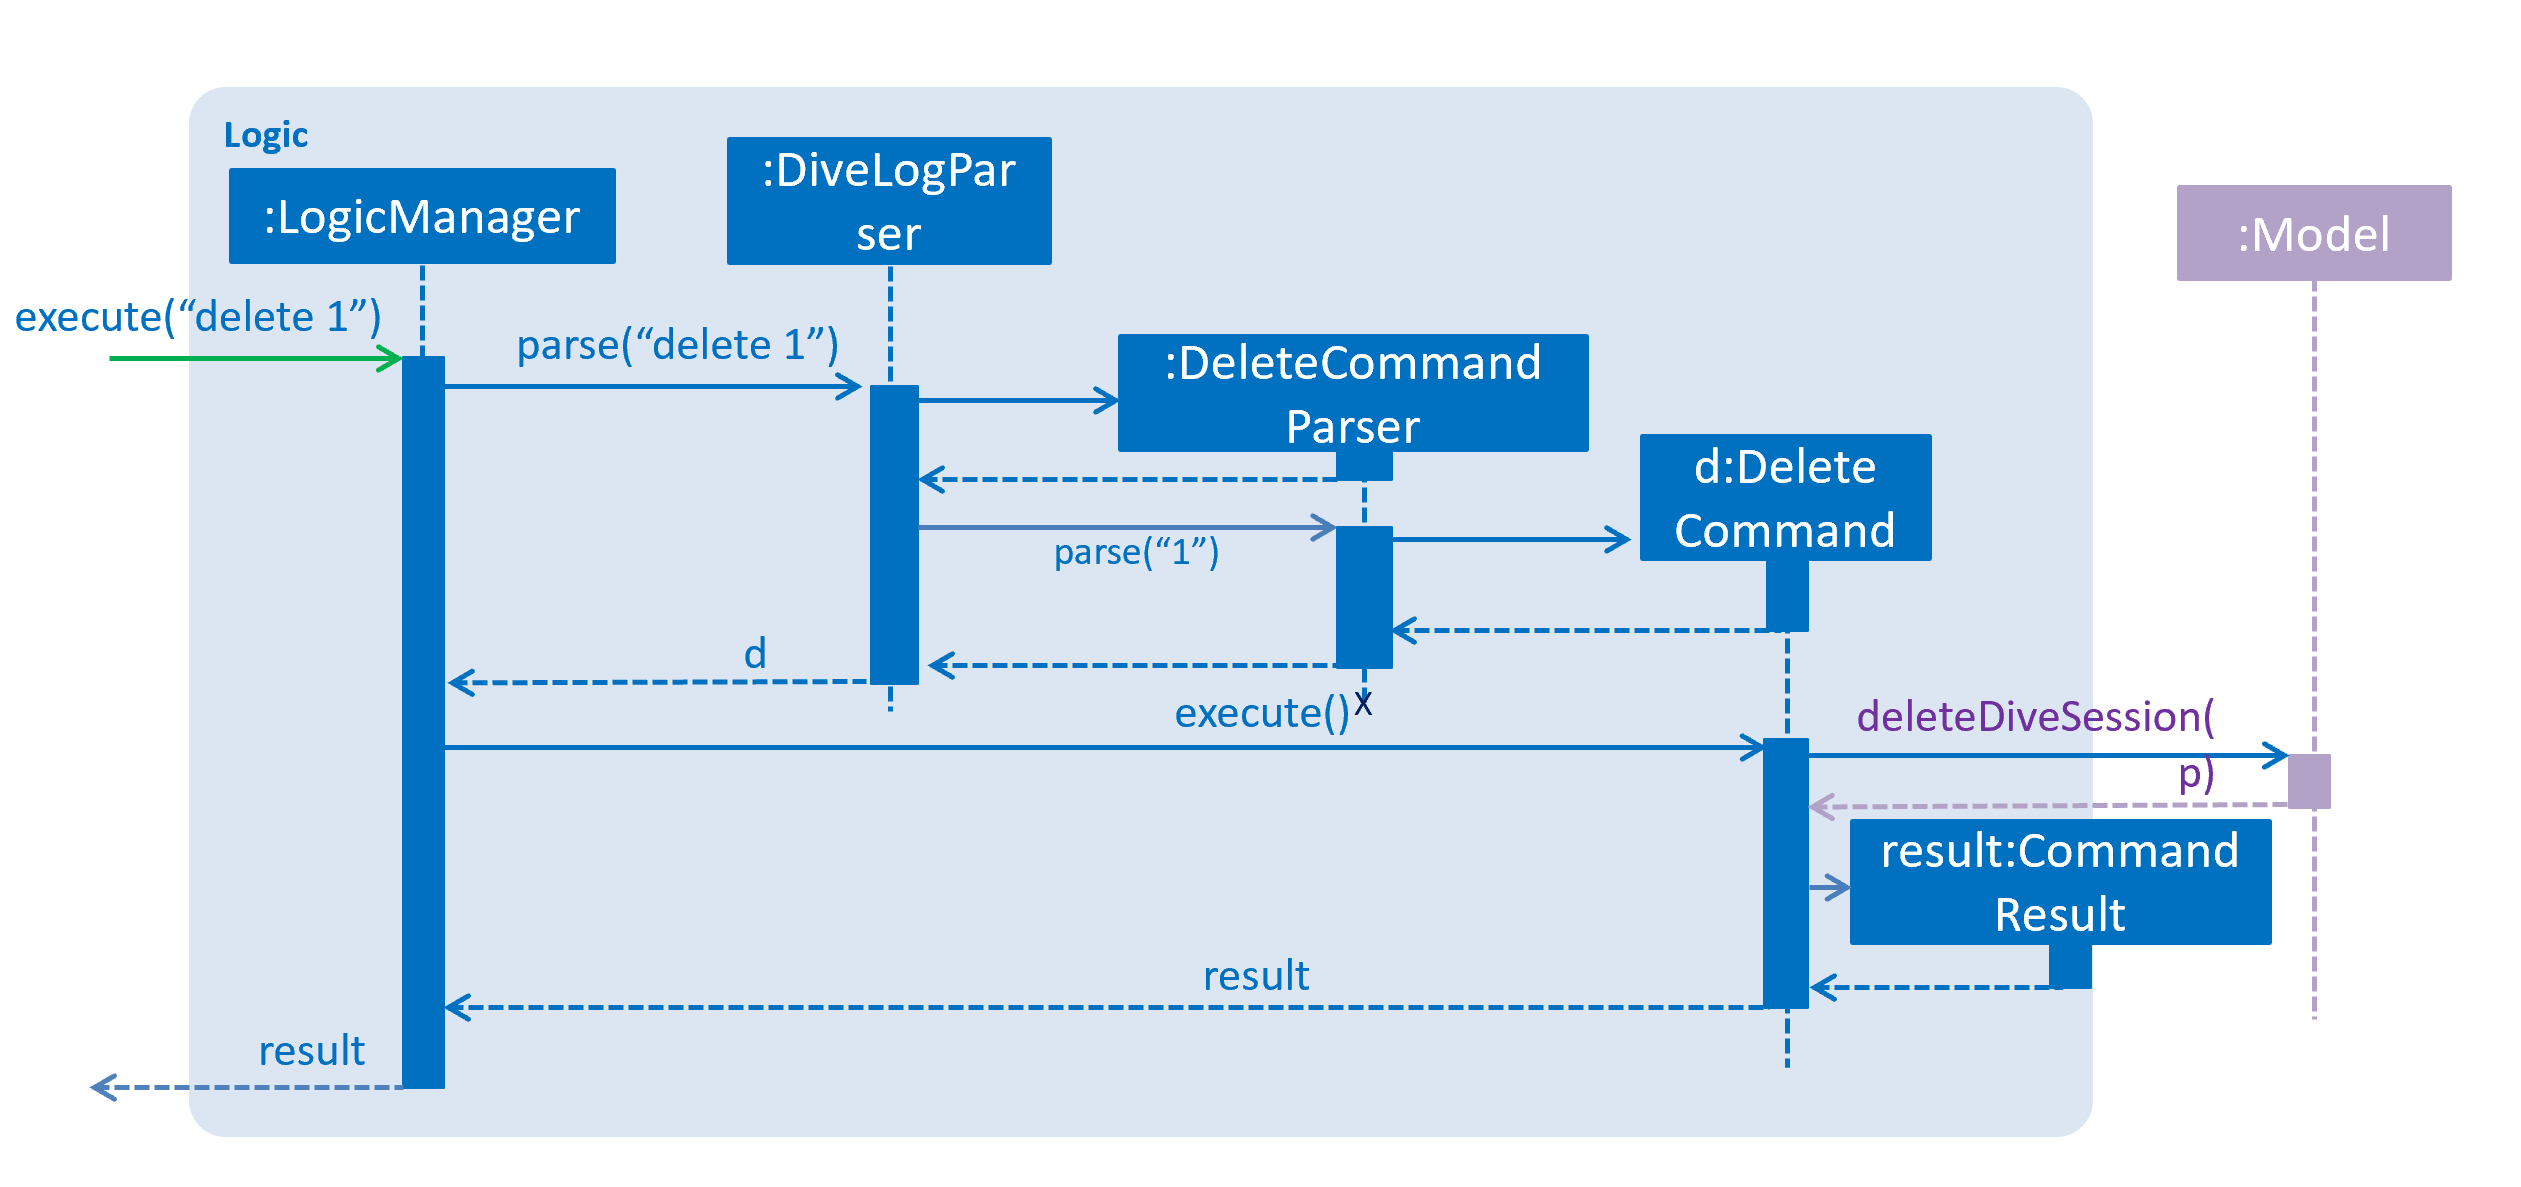
delete 1 Command3.4. Model component
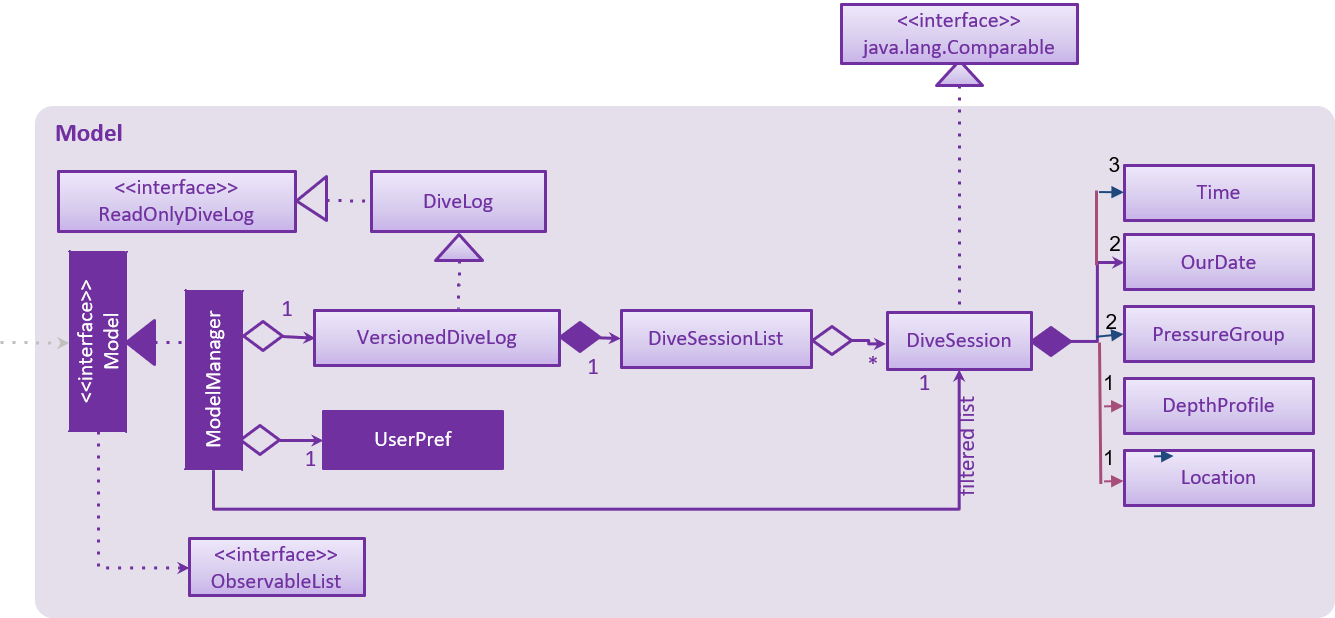
API : Model.java
The Model,
-
stores a
UserPrefobject that represents the user’s preferences. -
stores the DiveLog data.
-
enforces relational rules between dive sessions (i.e Dives may not overlap). For more information on this take a look at the section on [CRUD].
-
exposes an unmodifiable
ObservableList<DiveSession>that can be 'observed' e.g. the UI can be bound to this list so that the UI automatically updates when the data in the list change.
Some choices made here include the encapsulation of even simple values such as depth which is stored as a DepthProfile object.
By doing so suppose we want to extend Depth to support complex dives with multiple depths or different units, we can simply update
DepthProfile without breaking existing code. Similarly, we also decided to have DiveSession implement java’s Comparable interface
as it makes sorting the dives easier. Sorting the dives is an essential part of making sure that the dives retain their integrity.
A rough summary of what each class does is as follows:
| Class(es) | Role |
|---|---|
|
Holds data about the dives. Provides a few getters and setters. |
|
Encapsulates simple properties of the dives |
|
Stores a list of |
|
Handles updating the DiveSessionList. |
|
Handles undo/redo feature and versioning. |
3.5. Storage component
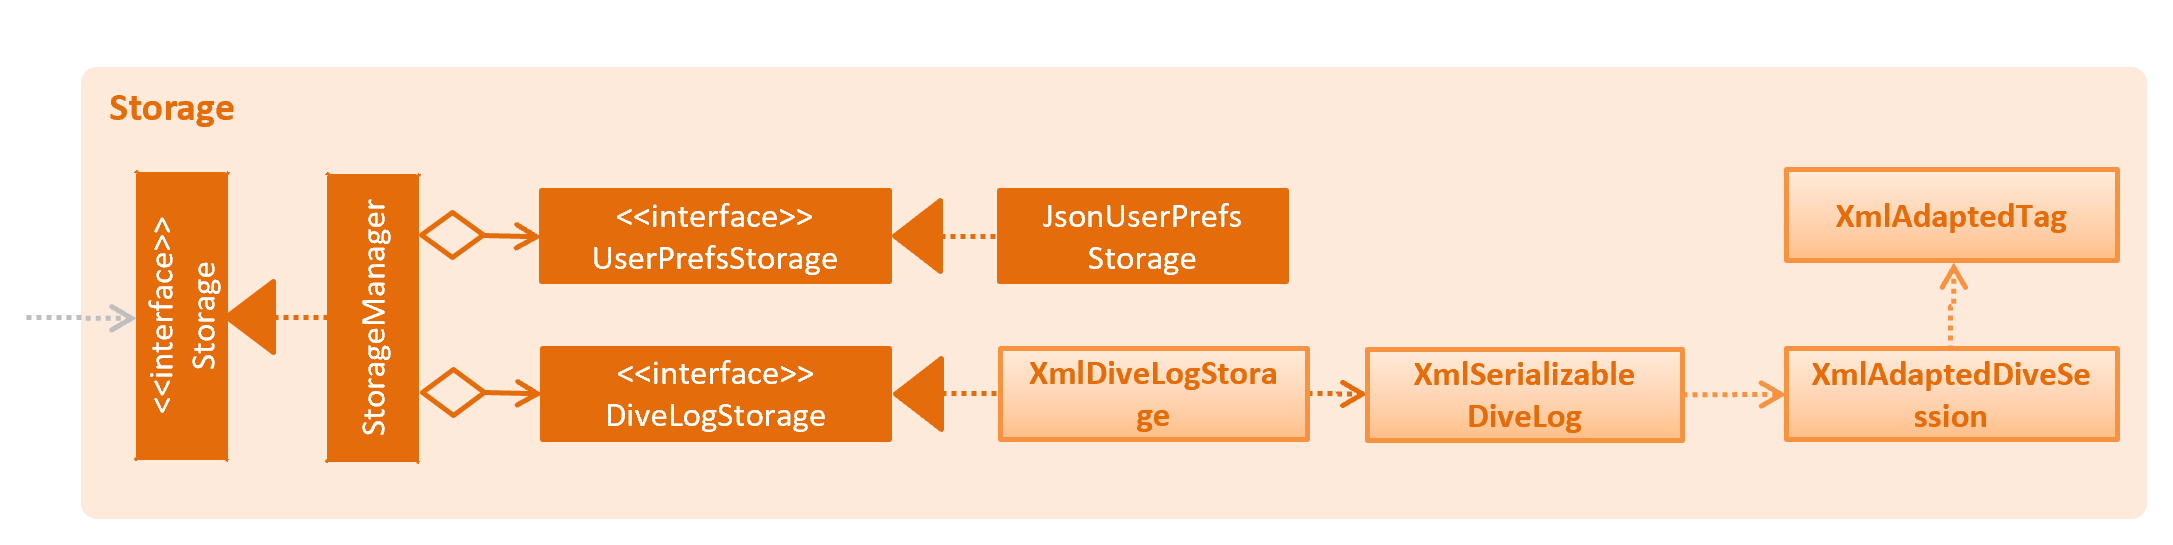
API : Storage.java
The Storage component,
-
can save
UserPrefobjects in json format and read it back. -
can save the Dive Log data in xml format and read it back.
3.6. Common classes
Classes used by multiple components are in the seedu.addressbook.commons package.
3.6.1. Application State
As of now certain things that are planned in the future require global data.
For instance, the set_units command. These are stored in the ApplicationState singleton.
Any other temporary information that is global and stored within the run
should be added as a property to ApplicationState.java
4. Implementation
This section describes some noteworthy details on how certain features are implemented.
4.1. Undo/Redo feature
4.1.1. Current Implementation
The undo/redo mechanism is facilitated by VersionedAddressBook.
It extends AddressBook with an undo/redo history, stored internally as an addressBookStateList and currentStatePointer.
Additionally, it implements the following operations:
-
VersionedAddressBook#commit()— Saves the current address book state in its history. -
VersionedAddressBook#undo()— Restores the previous address book state from its history. -
VersionedAddressBook#redo()— Restores a previously undone address book state from its history.
These operations are exposed in the Model interface as Model#commitAddressBook(), Model#undoAddressBook() and Model#redoAddressBook() respectively.
Given below is an example usage scenario and how the undo/redo mechanism behaves at each step.
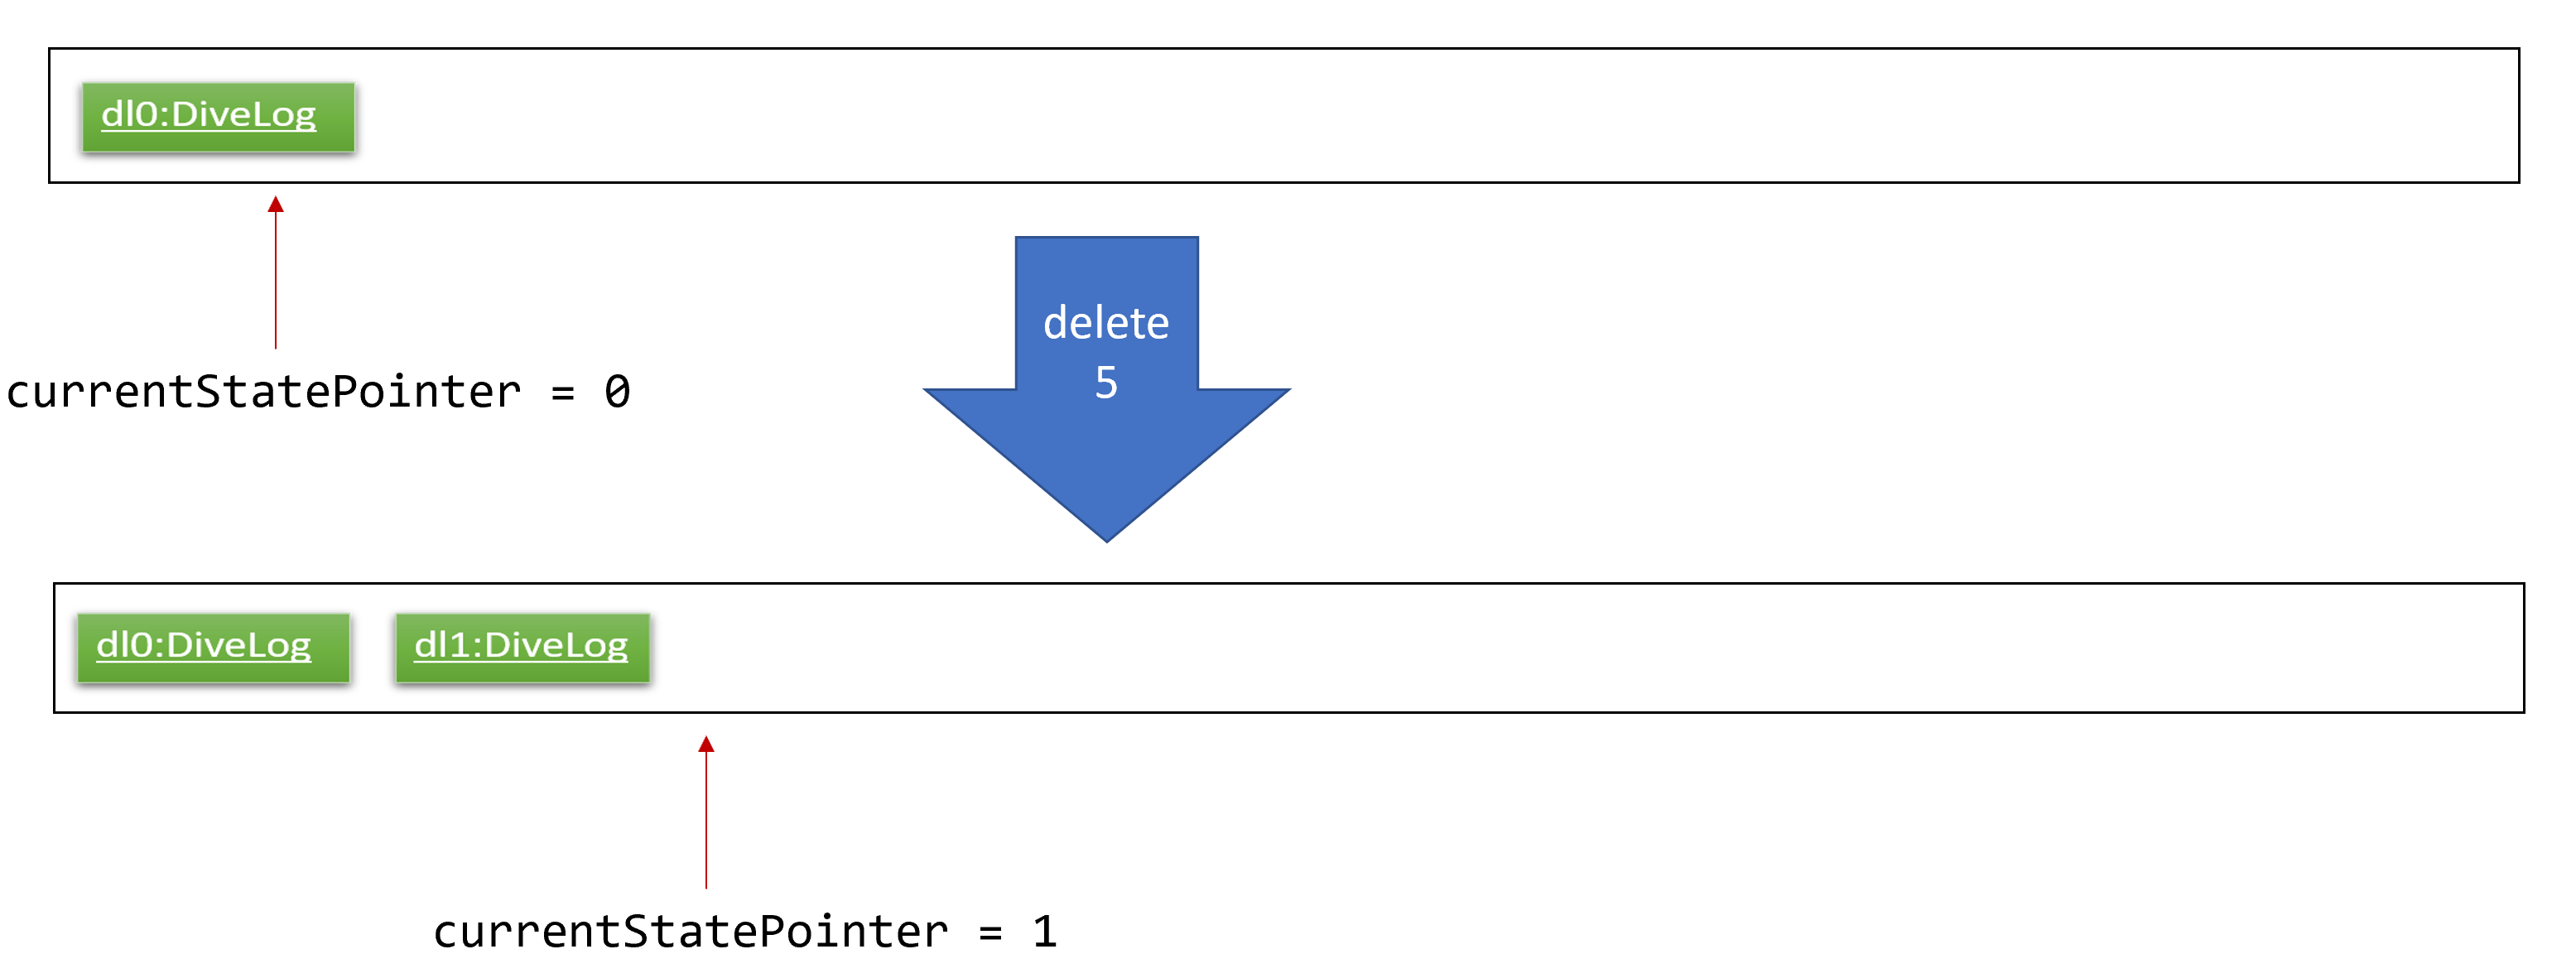
Step 1. The user launches the application for the first time. The VersionedAddressBook will be initialized with the initial address book state, and the currentStatePointer pointing to that single address book state.

Step 2. The user executes delete 5 command to delete the 5th diveSession in the address book. The delete command calls Model#commitAddressBook(), causing the modified state of the address book after the delete 5 command executes to be saved in the addressBookStateList, and the currentStatePointer is shifted to the newly inserted address book state.
Step 3. The user executes add n/David … to add a new diveSession. The add command also calls Model#commitAddressBook(), causing another modified address book state to be saved into the addressBookStateList.
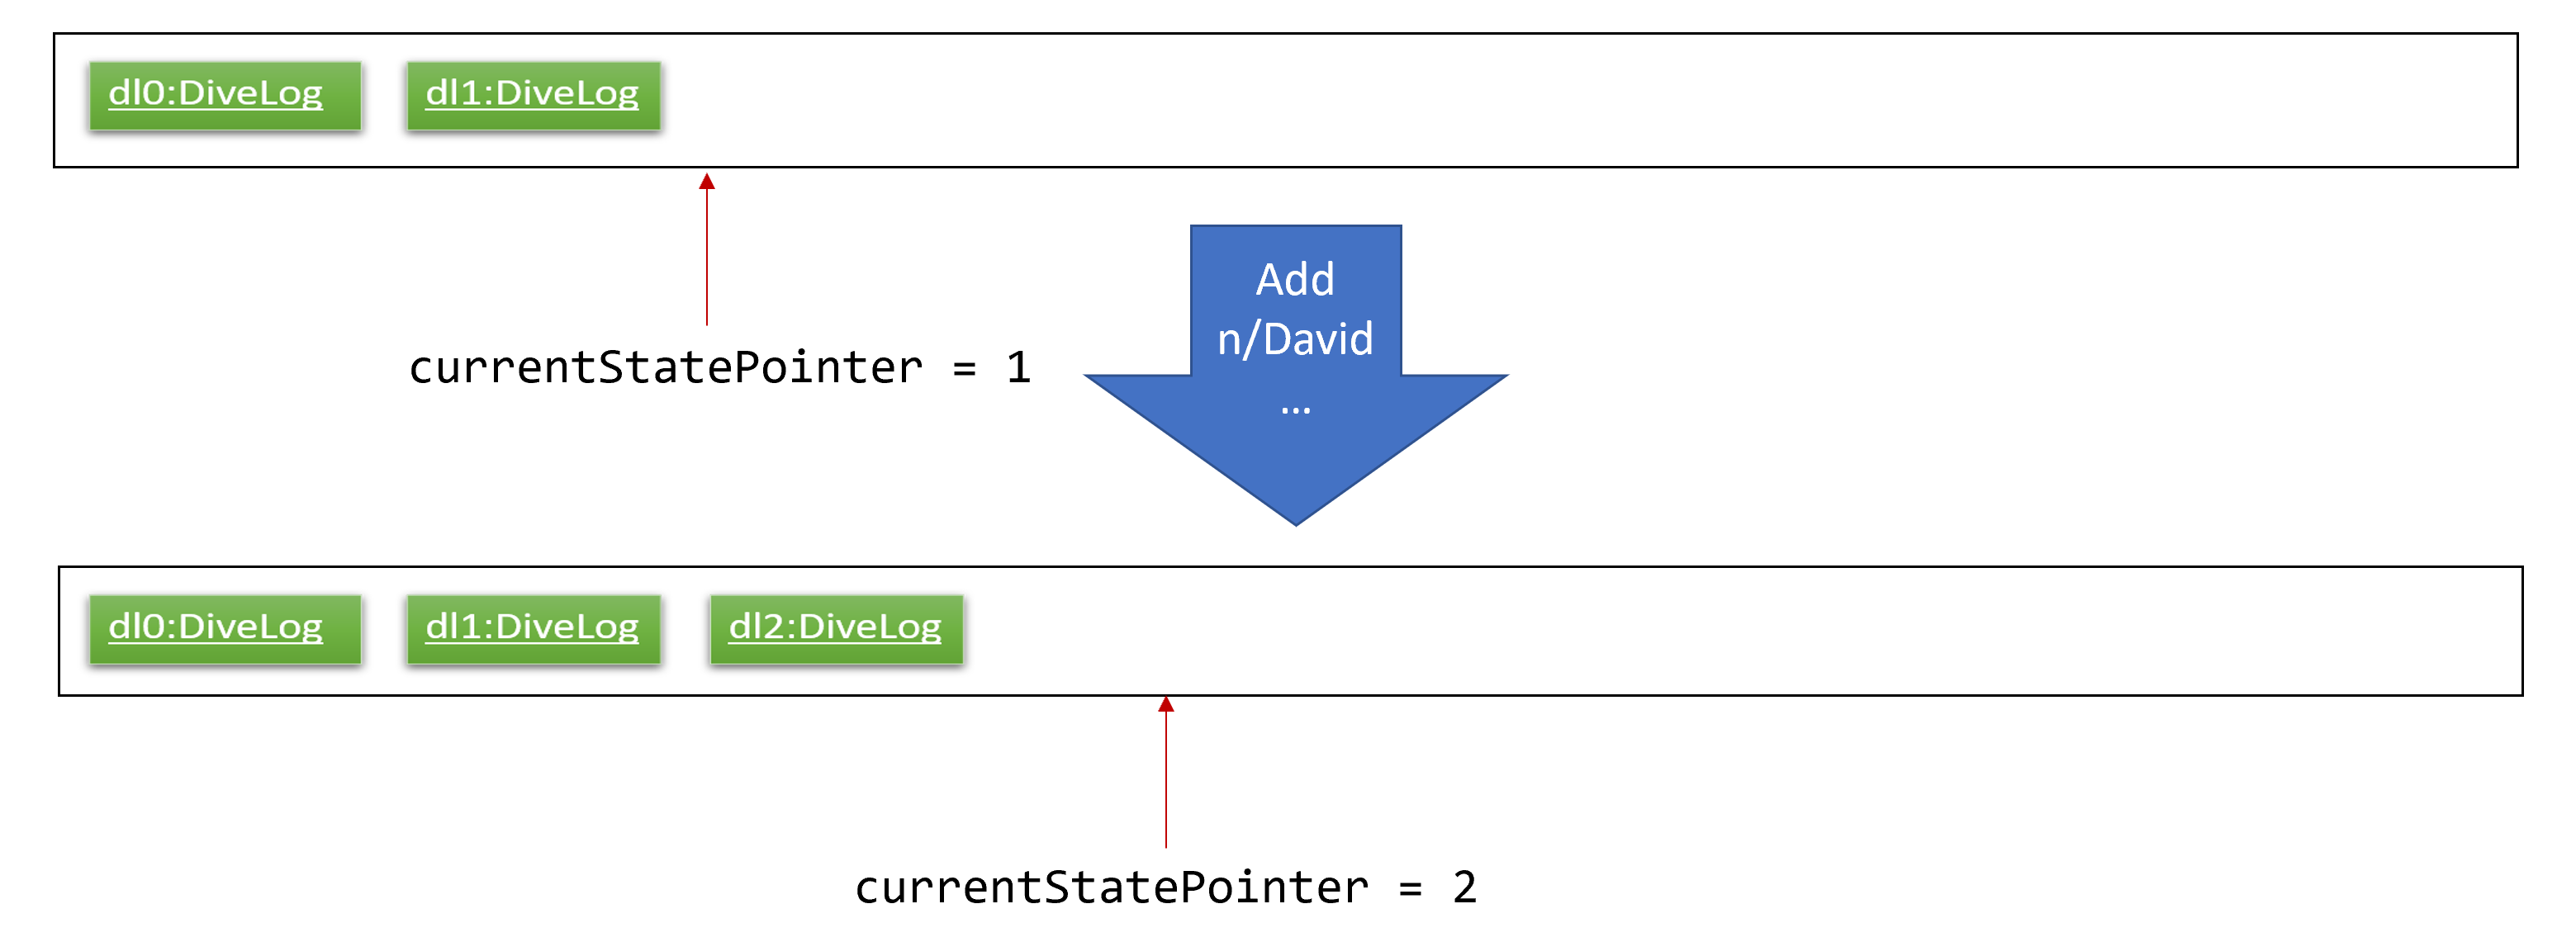
If a command fails its execution, it will not call Model#commitAddressBook(), so the address book state will not be saved into the addressBookStateList.
|
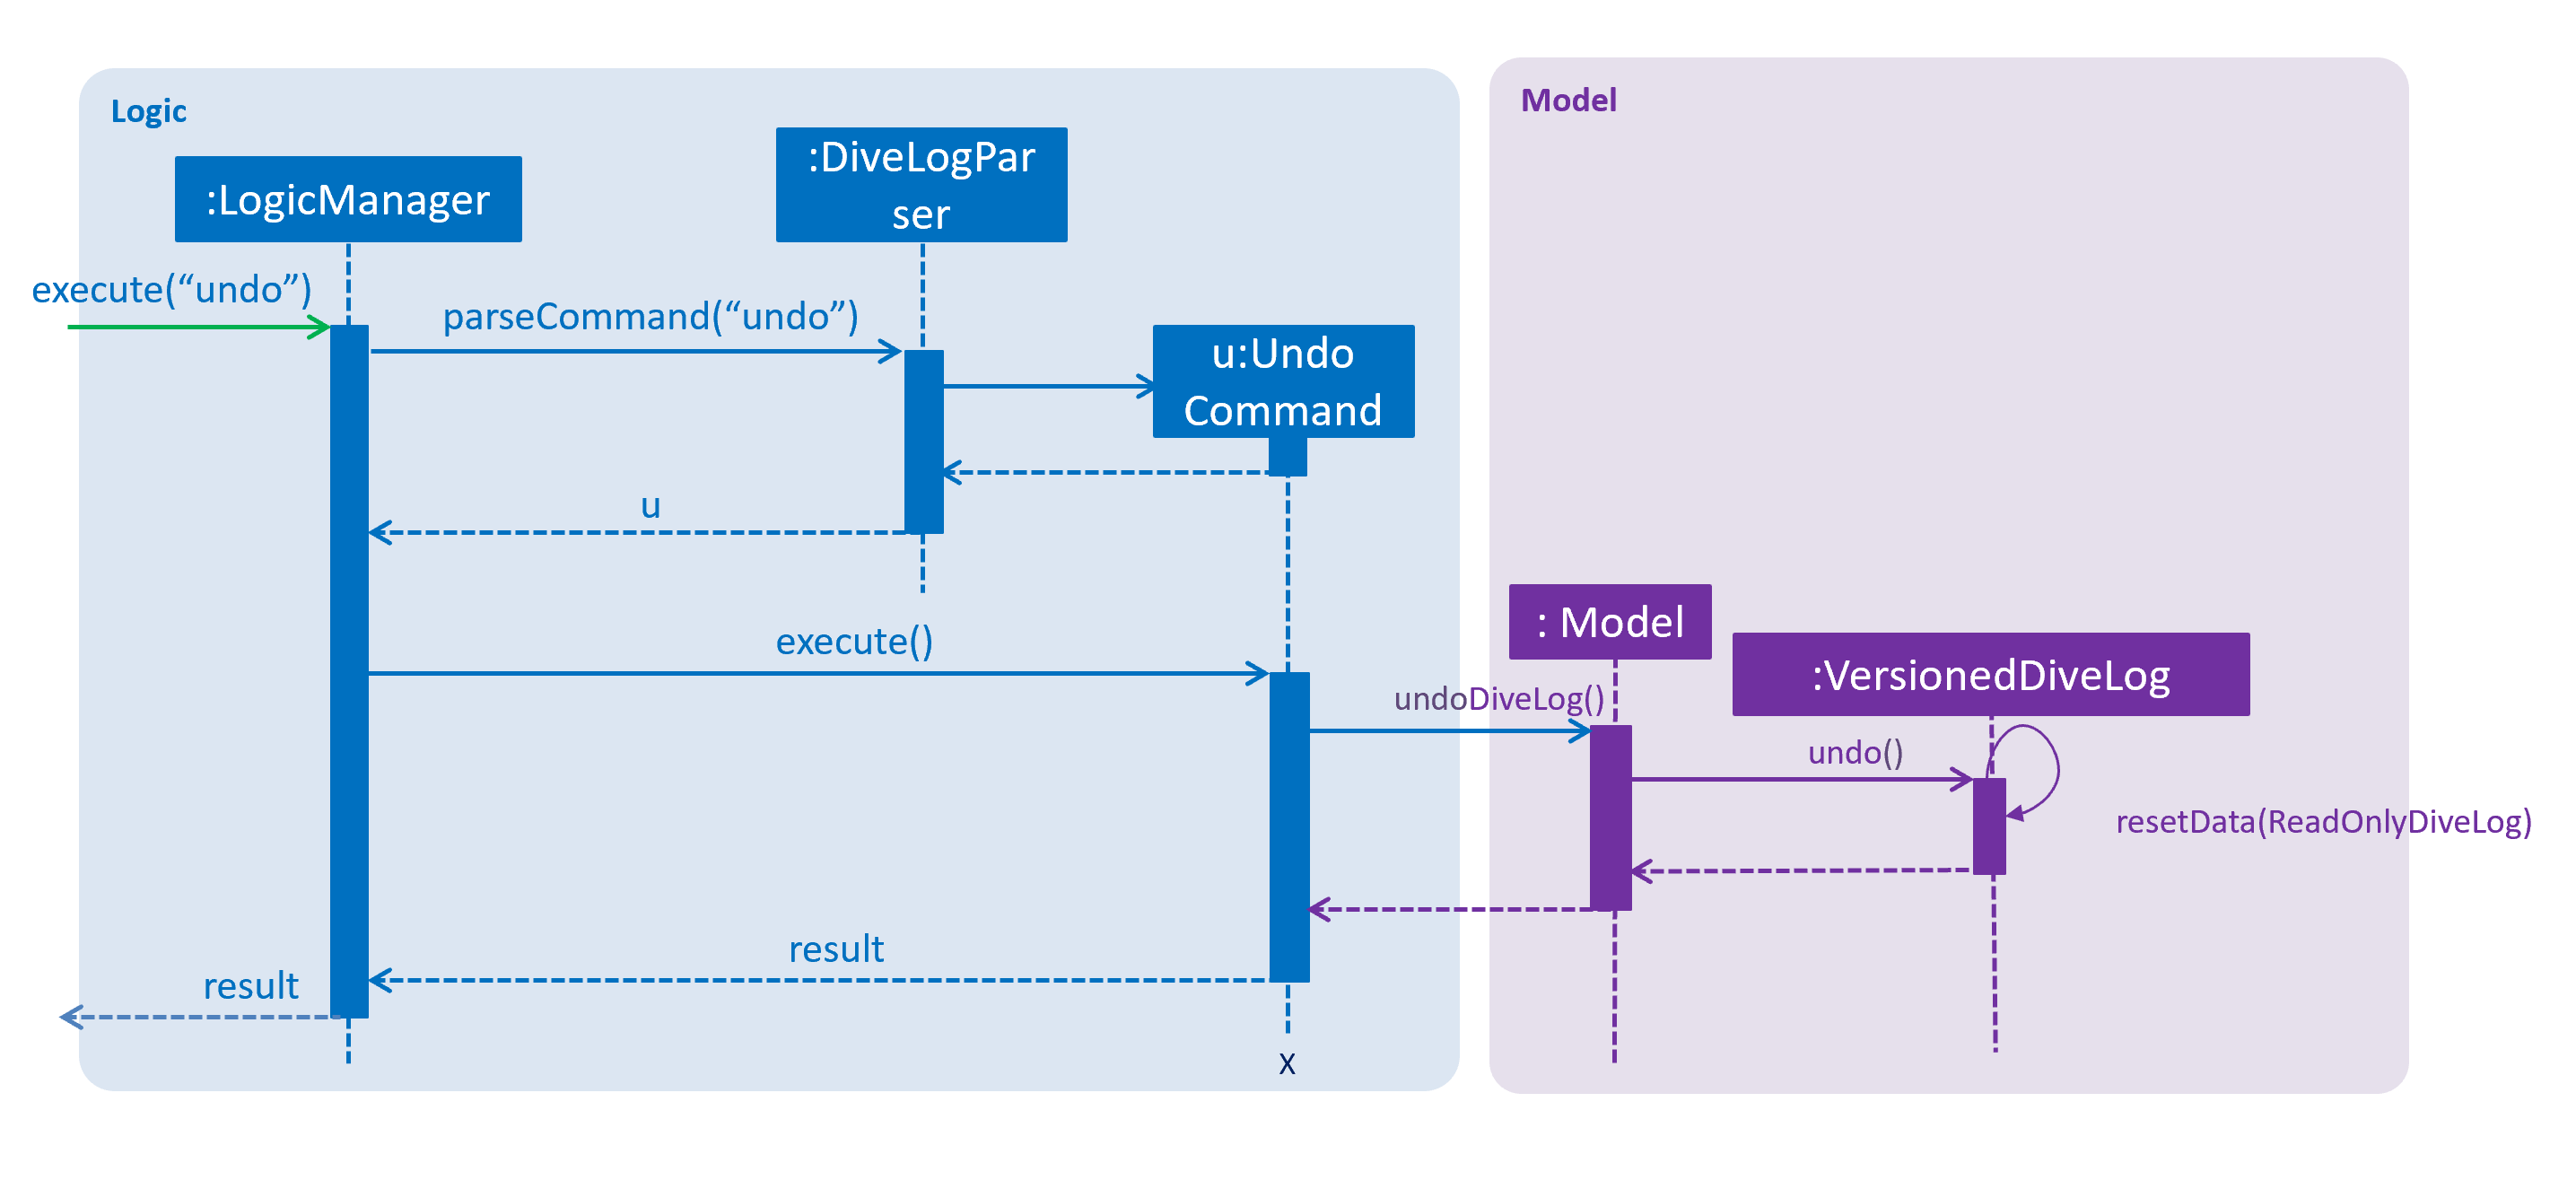
Step 4. The user now decides that adding the diveSession was a mistake, and decides to undo that action by executing the undo command. The undo command will call Model#undoAddressBook(), which will shift the currentStatePointer once to the left, pointing it to the previous address book state, and restores the address book to that state.
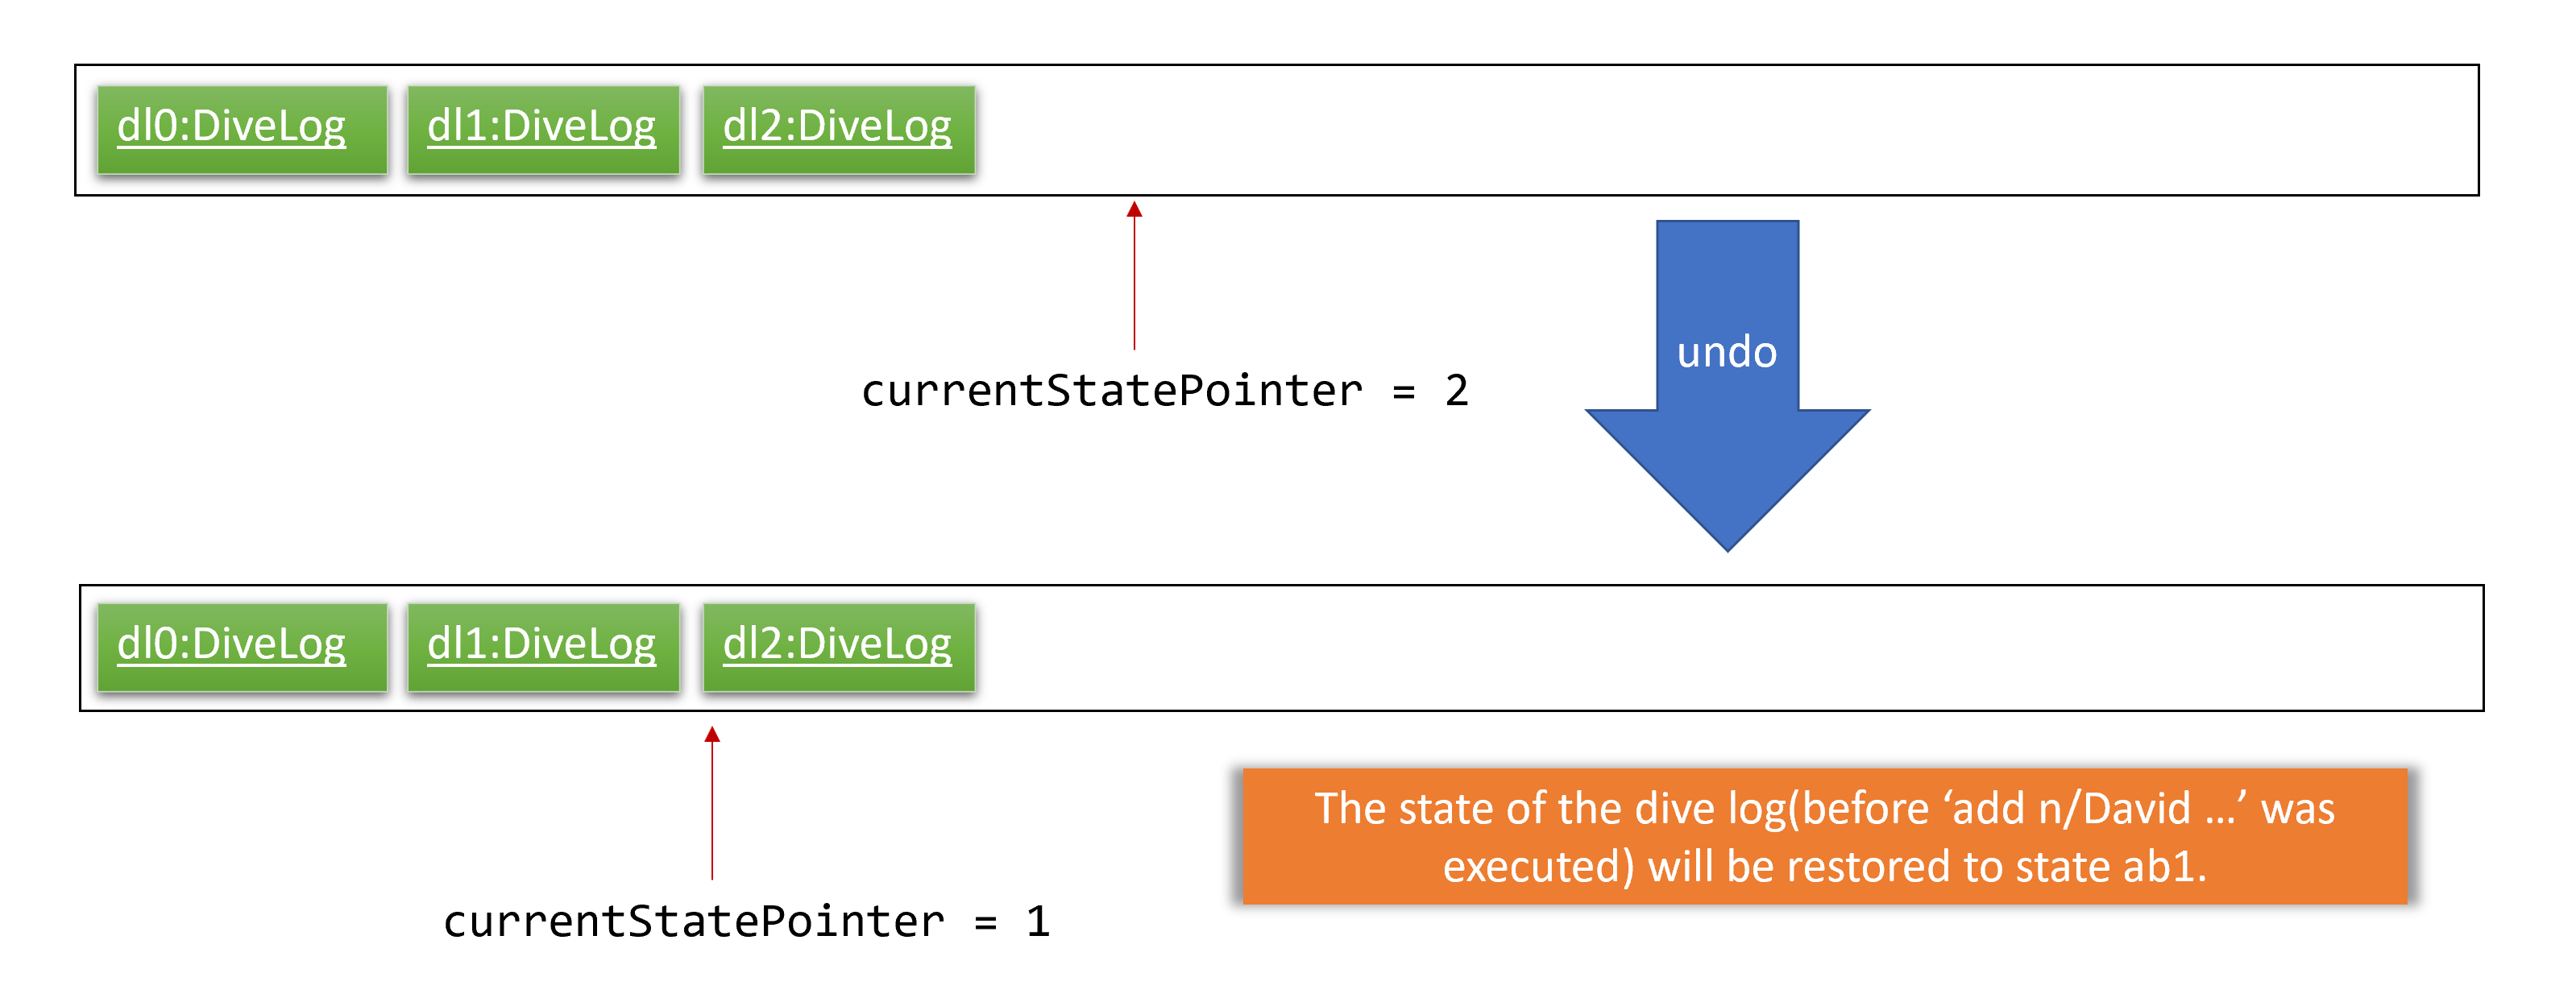
If the currentStatePointer is at index 0, pointing to the initial Dive Log state, then there are no previous address book states to restore. The undo command uses Model#canUndoAddressBook() to check if this is the case. If so, it will return an error to the user rather than attempting to perform the undo.
|
The following sequence diagram shows how the undo operation works:
The redo command does the opposite — it calls Model#redoAddressBook(), which shifts the currentStatePointer once to the right, pointing to the previously undone state, and restores the address book to that state.
If the currentStatePointer is at index addressBookStateList.size() - 1, pointing to the latest address book state, then there are no undone address book states to restore. The redo command uses Model#canRedoAddressBook() to check if this is the case. If so, it will return an error to the user rather than attempting to perform the redo.
|
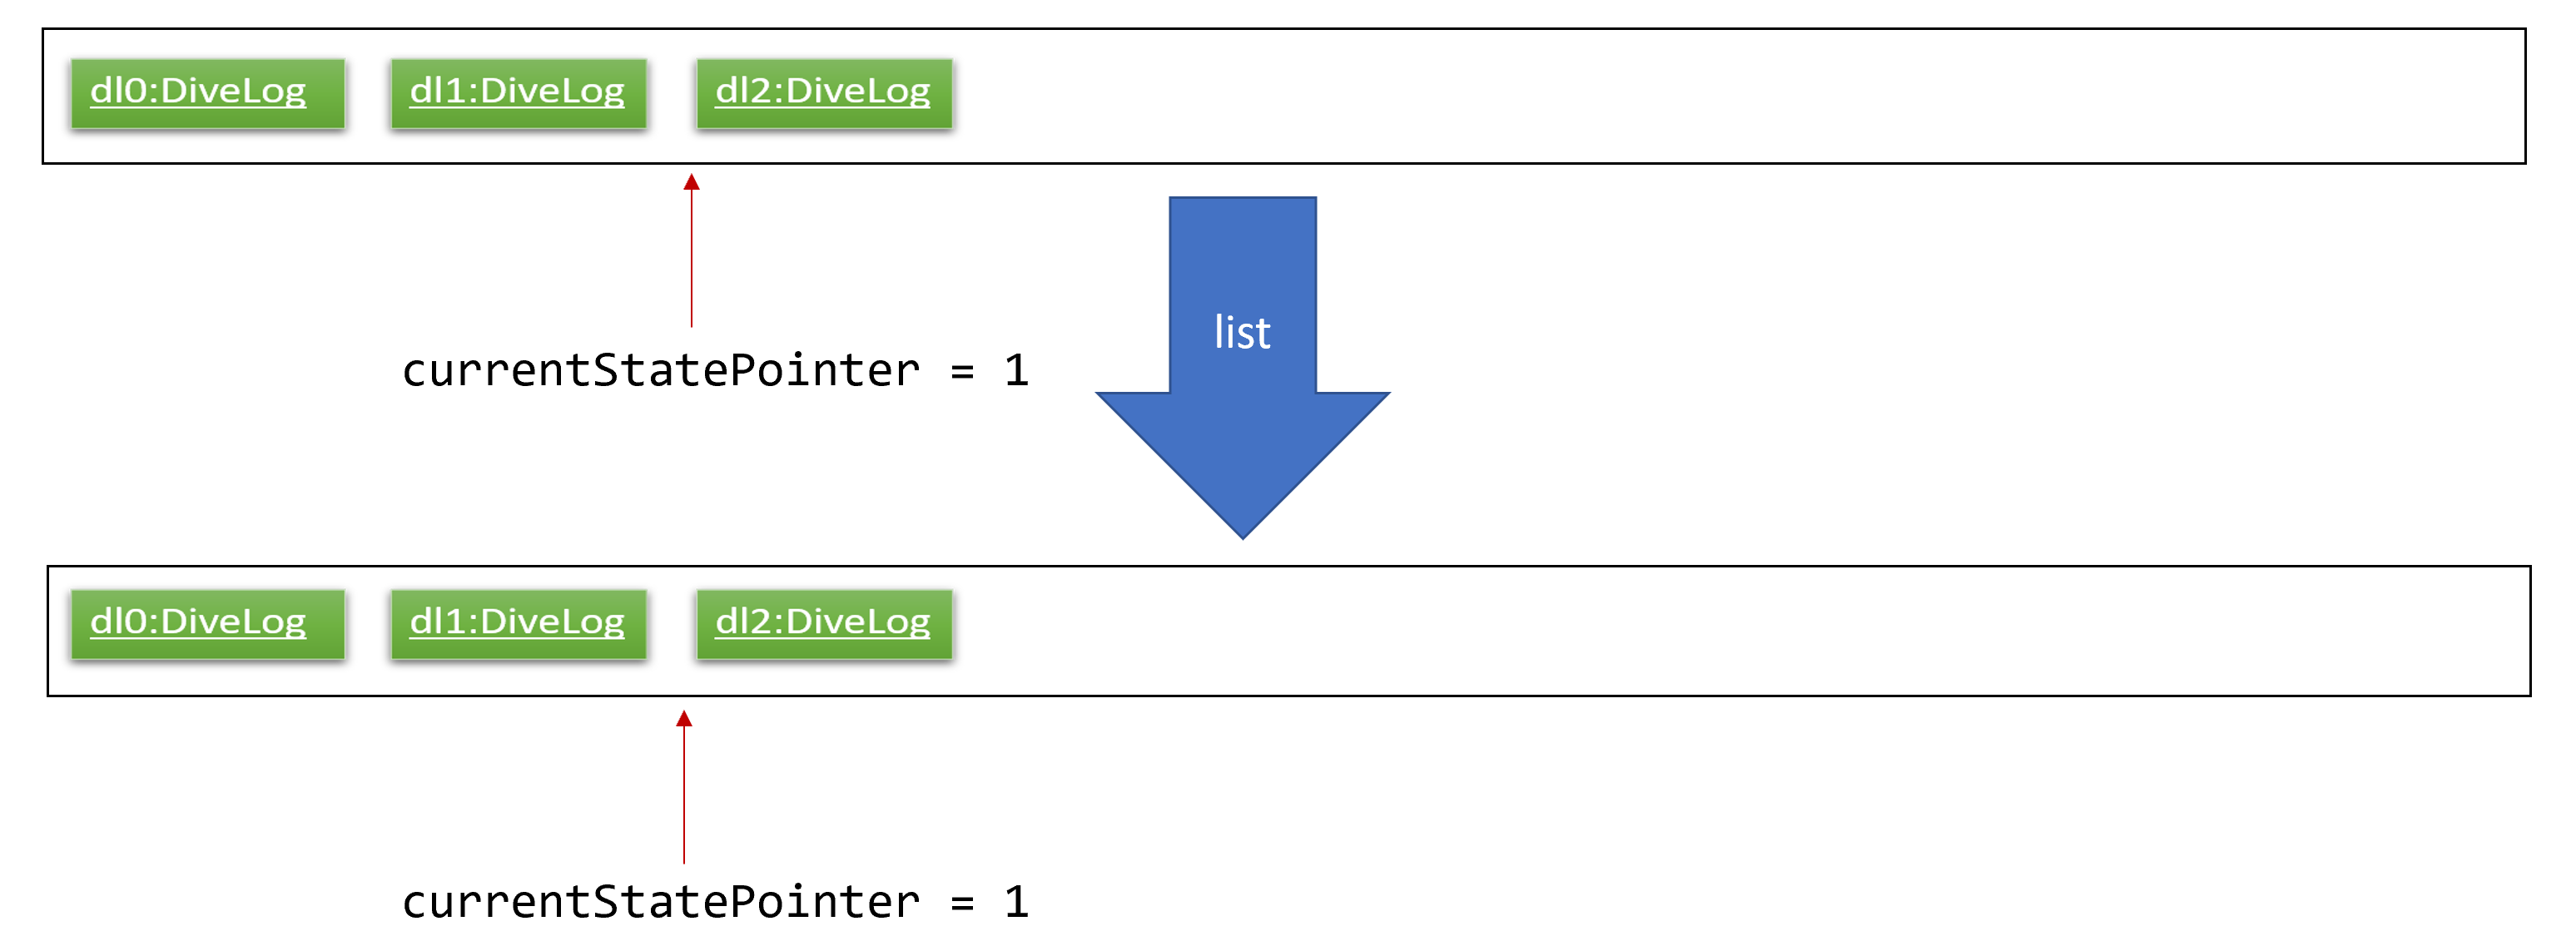
Step 5. The user then decides to execute the command list. Commands that do not modify the address book, such as list, will usually not call Model#commitAddressBook(), Model#undoAddressBook() or Model#redoAddressBook(). Thus, the addressBookStateList remains unchanged.
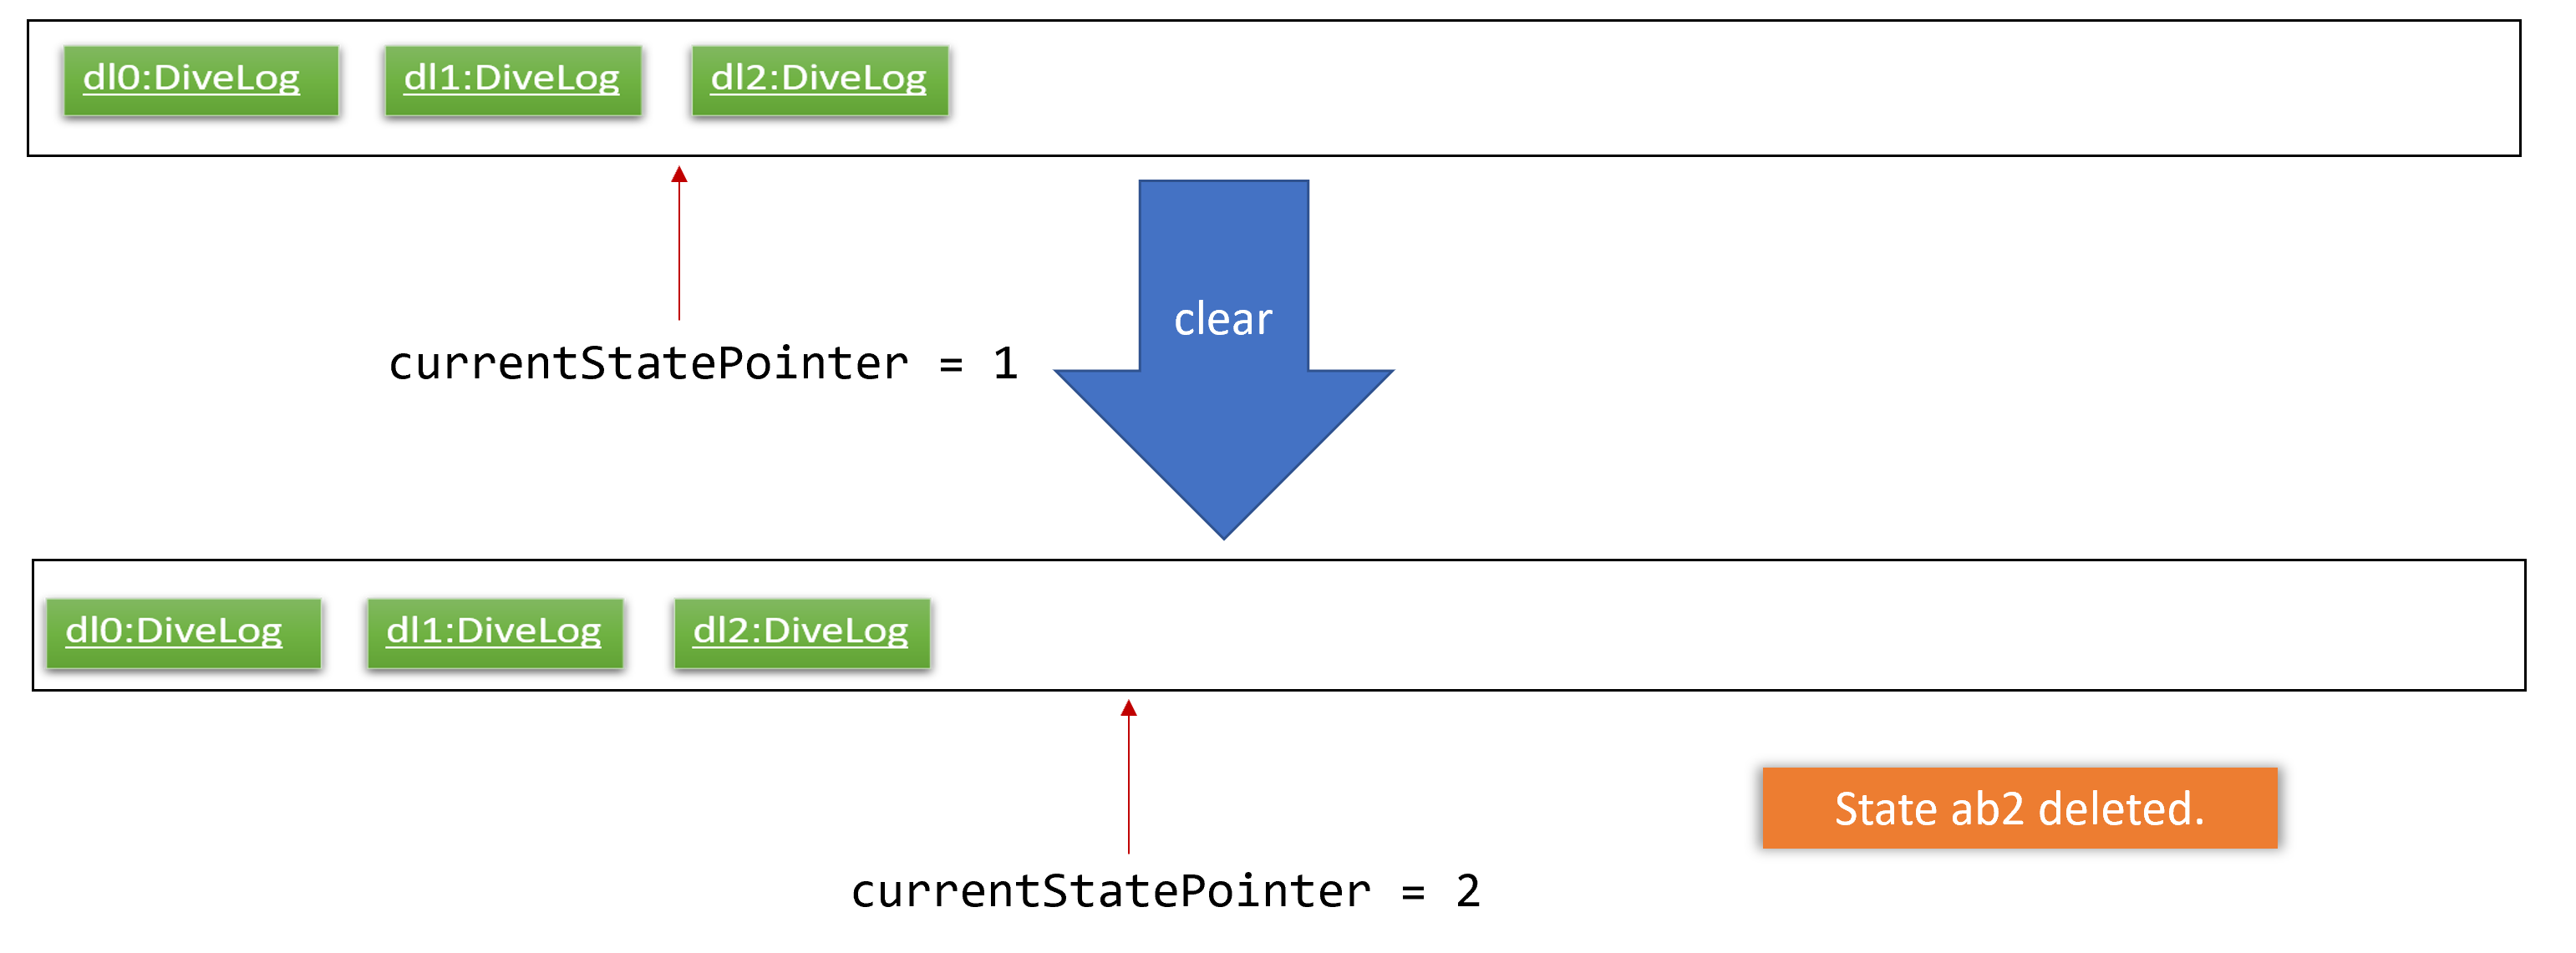
Step 6. The user executes clear, which calls Model#commitAddressBook(). Since the currentStatePointer is not pointing at the end of the addressBookStateList, all address book states after the currentStatePointer will be purged. We designed it this way because it no longer makes sense to redo the add n/David … command. This is the behavior that most modern desktop applications follow.
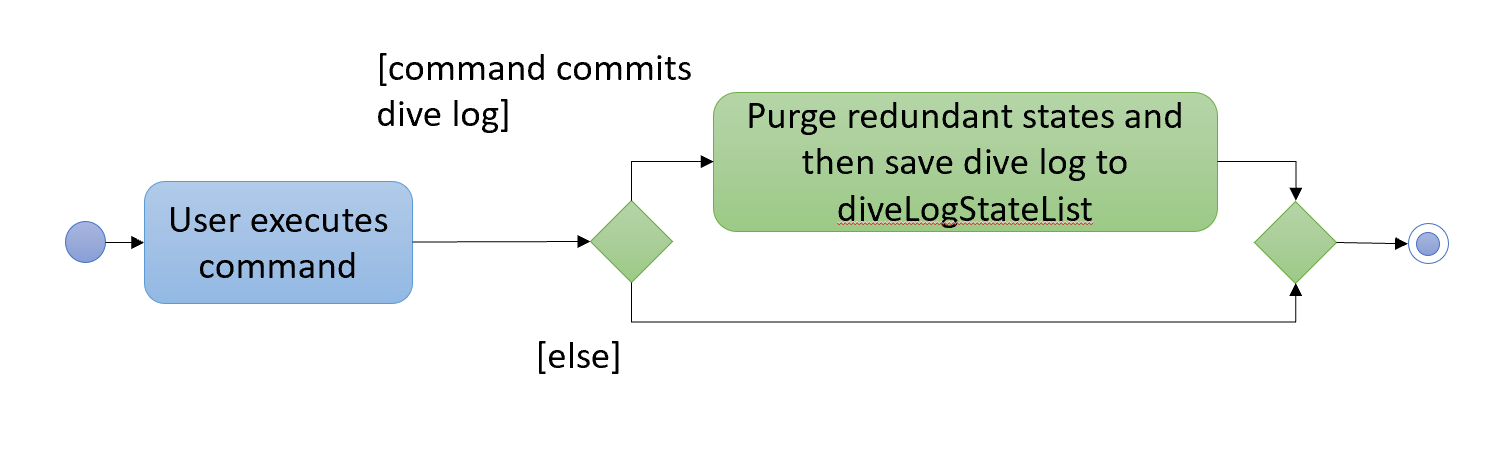
The following activity diagram summarizes what happens when a user executes a new command:
4.1.2. Design Considerations
Aspect: How undo & redo executes
-
Alternative 1 (current choice): Saves the entire Dive Log.
-
Pros: Easy to implement.
-
Cons: May have performance issues in terms of memory usage.
-
-
Alternative 2: Individual command knows how to undo/redo by itself.
-
Pros: Will use less memory (e.g. for
delete, just save the diveSession being deleted). -
Cons: We must ensure that the implementation of each individual command are correct.
-
Aspect: Data structure to support the undo/redo commands
-
Alternative 1 (current choice): Use a list to store the history of address book states.
-
Pros: Easy for new Computer Science student undergraduates to understand, who are likely to be the new incoming developers of our project.
-
Cons: Logic is duplicated twice. For example, when a new command is executed, we must remember to update both
HistoryManagerandVersionedAddressBook.
-
-
Alternative 2: Use
HistoryManagerfor undo/redo-
Pros: We do not need to maintain a separate list, and just reuse what is already in the codebase.
-
Cons: Requires dealing with commands that have already been undone: We must remember to skip these commands. Violates Single Responsibility Principle and Separation of Concerns as
HistoryManagernow needs to do two different things.
-
4.2. Looking Up Dive Tables For Pressure Groups
At the heart of the divelog app is the ability to automatically calculate nitrogen pressure groups.
To do so we adhere to PADI’s dive charts, available here https://elearning.padi.com/company0/tools/RDP_Table%20Met.pdf. These charts provide a lookup table for divers through which they can determine
their current pressure group. The underlying implementation for these charts can be found in the PadiDiveTable class.
A such the dive tales are stored in the resources folder as JSON files. They are loaded using the DiveTableUtil class
via the FASTXML Jackson library. The PadiDiveTable itself is a singleton class. This choice was made as it makes sense to
load the Dive Tables only once at the stat into memory (although in its current form it is not the case).
4.2.1. Design Considerations
Aspect: Retrieving Dive Tables
-
Alternative 1 (current choice): Use JSON files
-
Pros: Easy to change data within tables.
-
Cons: May have performance issues if the tables are too large as it reads from disk.
-
-
Alternative 2: Hard code the tables
-
Pros: Have mildly smaller impact on performance as data is loaded into memory at start up.
-
Cons: Very tedious to implement, results in unreadable code.
-
Aspect: Minimising File Reads And Data Duplication
-
Alternative 1 (current choice): Use a singleton class
-
Pros: It is possible to read the file only once and the memory used by the objects will only exist in one place. This saves both memory and disc writes.
-
Cons: Can be troublesome to implement.
-
-
Alternative 2: Just use
PADIDiveTablestandard classes-
Pros: Easy to implement
-
Cons: Wastes memory and performs unnecessary IO.
-
4.3. Consistency checks for DiveSession objects during Creation/Update
At its heart, the application is a dive log. The source code for this application was adopted from an addressbook application. The addressbook has a relatively simple set of rules, DiveLog on the other hand has a more complicated set of rules which have to be followed. This is because the starting pressure group on each dive is dependent on the previous dive’s end time and ending pressure group. In turn, the ending pressure group is dependent on the starting pressure group and depth of a dive. This poses a lot of problems as a single update to the system requires recalculating all subsequent dive’s pressure groups. Furthermore, it is only after all calculations are complete that the system can make sure that the update is valid. Some possible sources of inconsistency include:
-
Dives with overlapping time periods - these cause problems in the chain as the PADI tables are only meant to be used by a single diver doing one dive at a time.
-
Dives that are deemed too deep and too long by PADI - we have no way of determining their nitrogen level apart from the tables.
-
Dives which cause other dives to become too dangerous. Lets say you add a dive in between two dives. This may cause the later dive to be deemed as too dangerous.
At the end we have incorporated most of the code into our model. For add and edit we required atomicity thus the general flow is as follows:
-
Create a temporary copy of the
DiveSessionList. -
Perform the update/addition on this list and sort it to make calculations easier.
-
Check if there are any overlapping dives
-
If there are overlapping dives throw
DiveOverlapsException.
-
-
Recalculate pressure groups and check for consistency
-
If not consistent throw
LimitExceededExceptionerror.
-
-
Commit new
DiveSessionListto divelog. UpdateVersionedDivelog's current pointer.
The flow can be seen in the sequence diagram below:
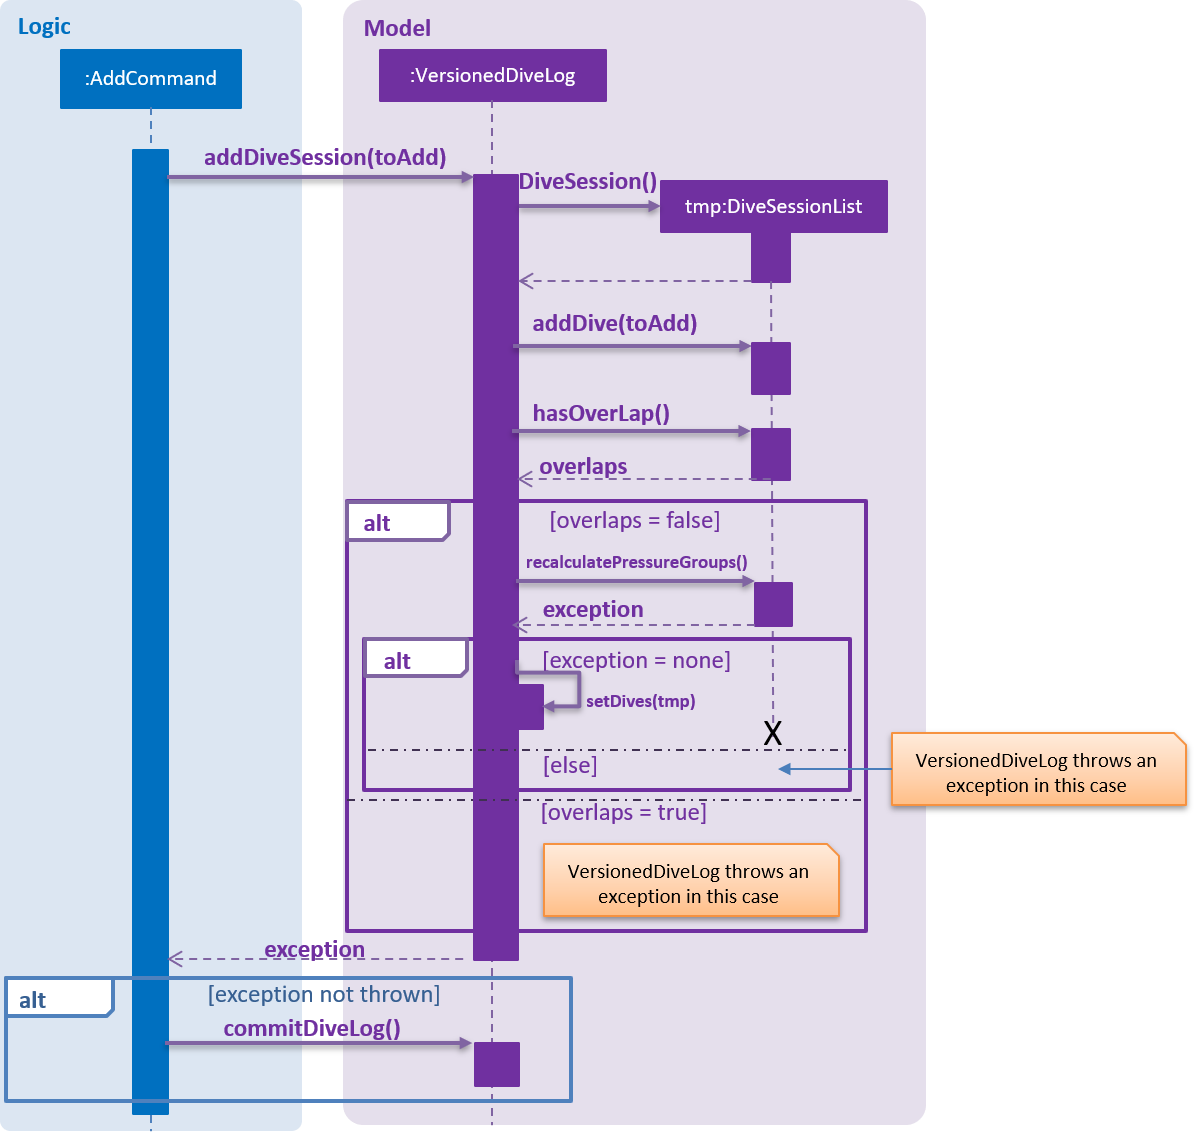
In terms of calculations, the pressure group properties of the DiveSession objects themselves will mutate.
4.3.1. Design Considerations
Upon failure of calculations it is important that the divelog remains in a consistent state. For instance, when updating the dive log if after adding a dive we see that it is causing issues in the dive log, or if we edit a dive to have overlapping time periods with another dive, the divelog should roll back the latest transaction and throw an error. This calls for atomicity in our Create, Update and Delete. Fortunately, in our case, deleting the dive cannot actually cause a violation as it only makes the dives safer. Thus our design considerations could be summed up as follows:
-
Ensure consistency in the divelog
-
Ensure creating and Updating the divelog are atomic
Aspect: Ensure consistency in the divelog
-
Alternative 1: implementing rules for consistency in
logicmodule.-
Pros: Stronger Separation of Concerns.
-
Cons: Will require duplicating code accross
AddCommandandEditCommand. This will lead to inconsistent behaviour between the two and more lines of code to debug.
-
-
Alternative 2: implementing rules for consistency in
modelmodule.-
Pros: Only one code base to debug. System will remain consistent.
-
Cons: Weaker separation of concerns than if implemented separately. Can also mean a bug effects both add and edit making the system unreliable.
-
Aspect: Ensure creating and updating the divelog are atomic
-
Alternative 1: Creating a temporary copy of the list and mutating the copy
-
Pros: Simple to implement and fast.
-
Cons: Inefficient
-
-
Alternative 2: Having a separate data structure that only handles mutation after the edited dive.
-
Pros: Will be more efficient.
-
Cons: More code will need to be written. Since
VersionedDiveLogalready maintains copies, it is just a matter of passing the reference of the temporary dive list to the system. Furthermore, most divers will not have more than 100 dives.
-
4.4. Calculating Pressure Groups
The main purpose of this Divelog application is to relieve divers from the tedious task of manually calculating their pressure groups using the PADI recreational dive planners when planning for / upon completing a dive.
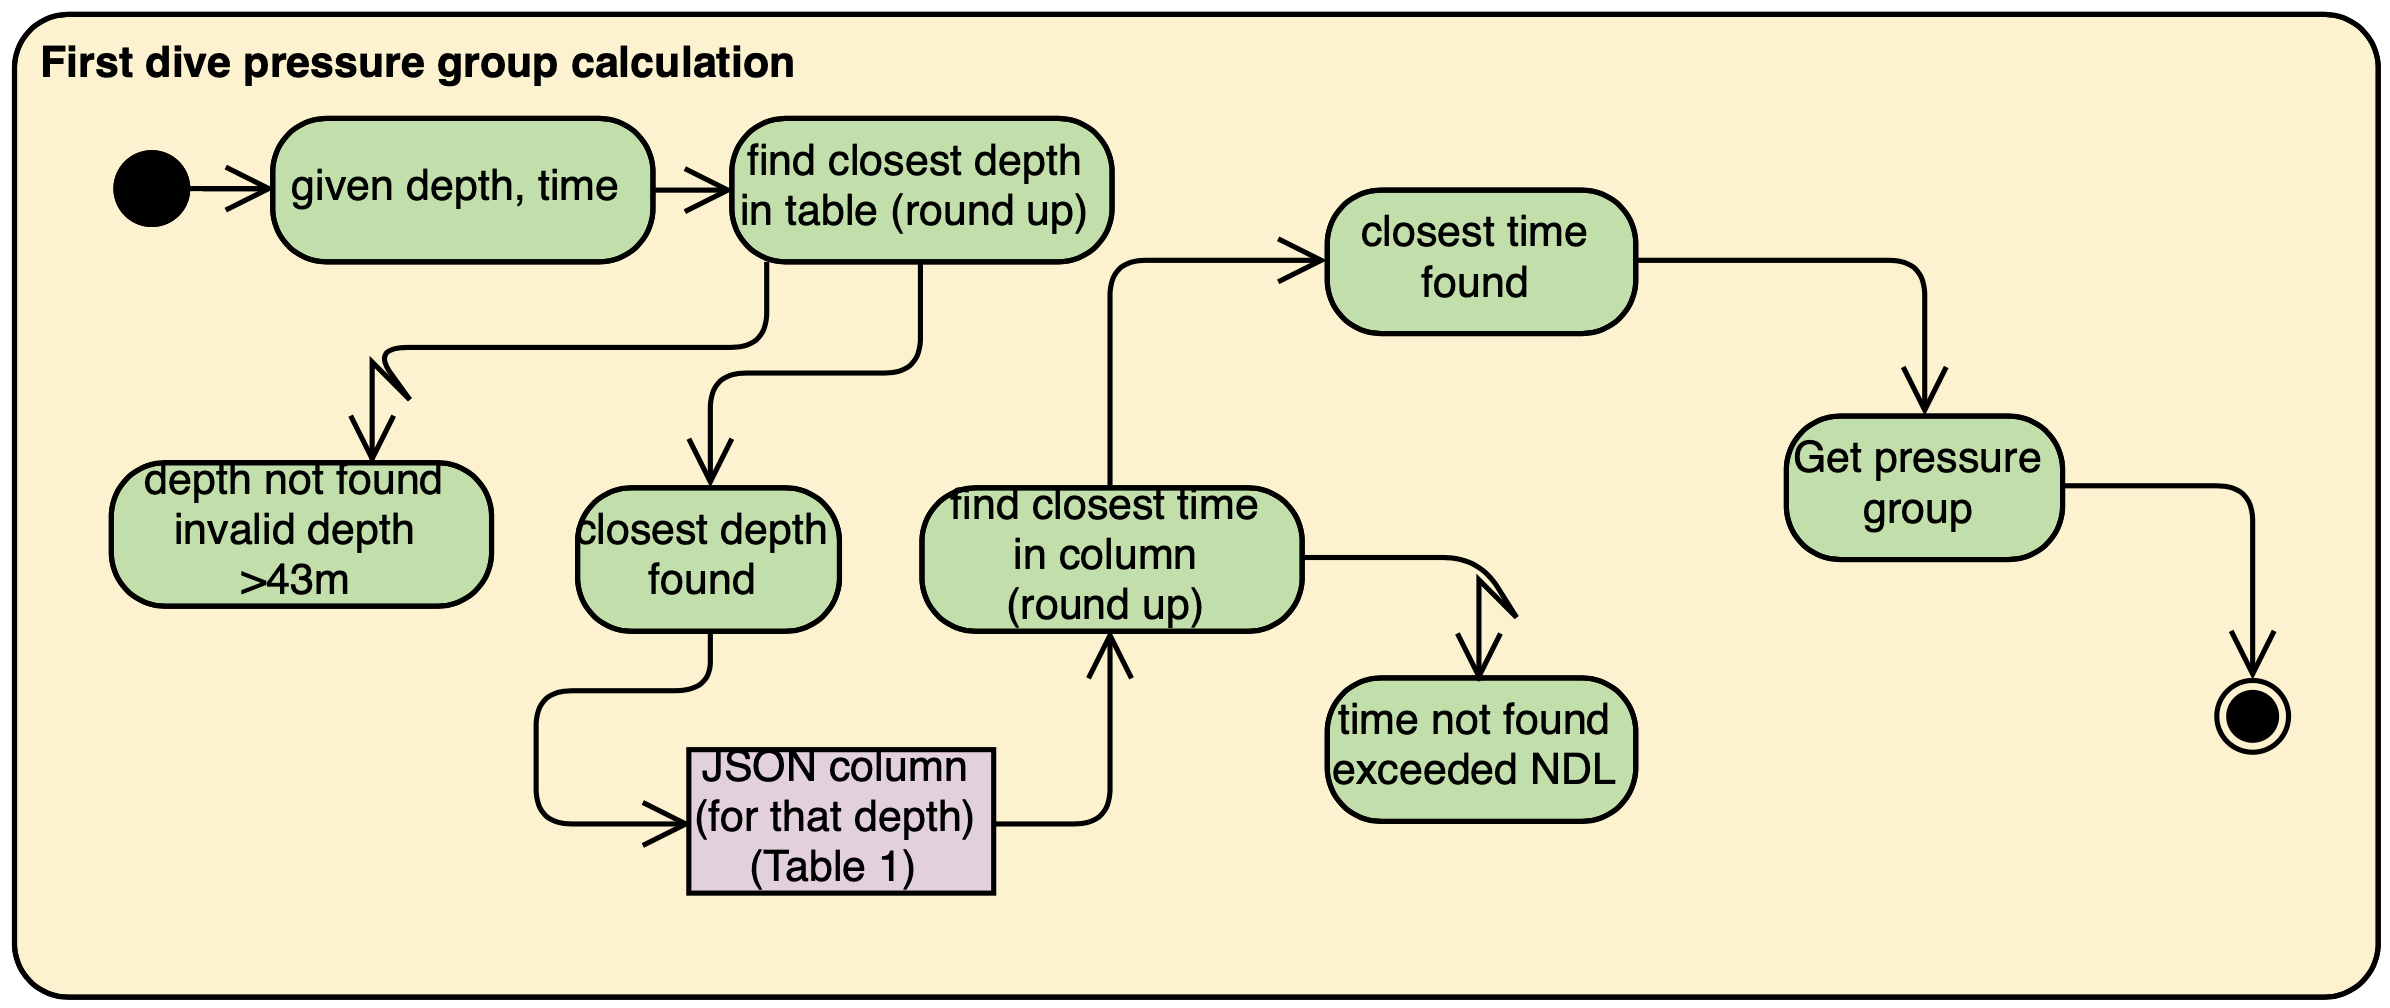
4.4.1. Calculating a new (first) dive end pressure group
As described in the activity diagram shown below, calculating the end pressure group of a new (first) dive only requires the depth and the time of the dive, and Table 1 of the PADI recreational dive planner. In the case of a new dive, the actual bottom time is equals to the total bottom time since there is no residual nitrogen in the body, and hence there is no need to know the starting pressure group since it will be "A" naturally.
Two exceptions will be thrown along the way if - 1. If the depth given is beyond the scope of the recreational dive planner (i.e. 43 metres and beyond) as a dive beyond 42 metres will be a decompression dive. 2. For a valid depth, if the no decompression limit is exceeded, the dive will become a decompression dive and is out of scope of planning recreational dives.
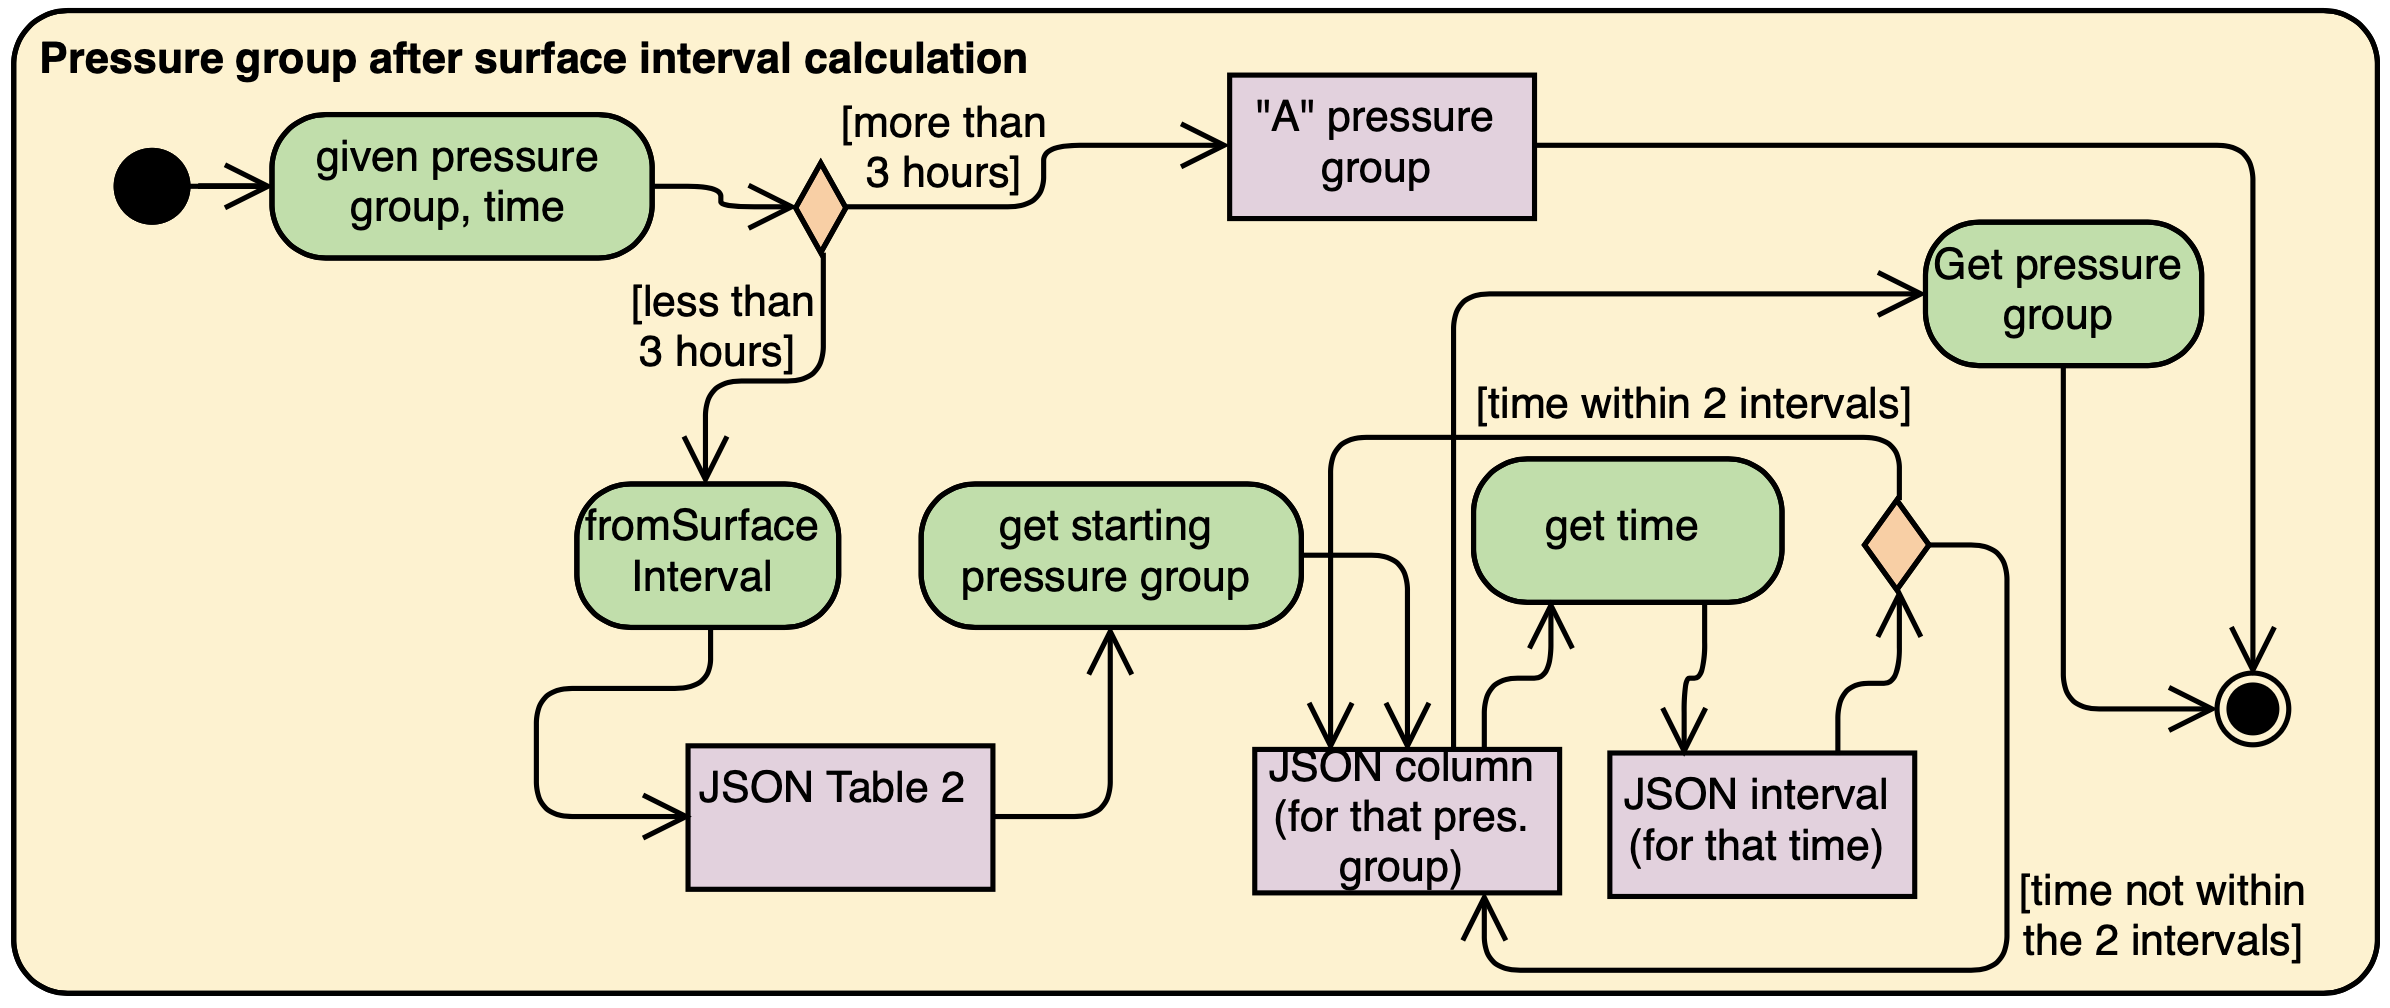
4.4.2. Calculating pressure group after surface interval
After finishing a dive, divers may want to go for a repetitive dive, and so they have to check for their pressure group after a certain amount of time spent on land. The activity diagram shown below shows that calculating the pressure group after a surface interval requires the end pressure group of their last dive, and the time they spent on land. If they had spent more than three hours on land, their current pressure group would reach the minimum "A". If not, then they would have to refer to Table 2 of the recreational dive planner.
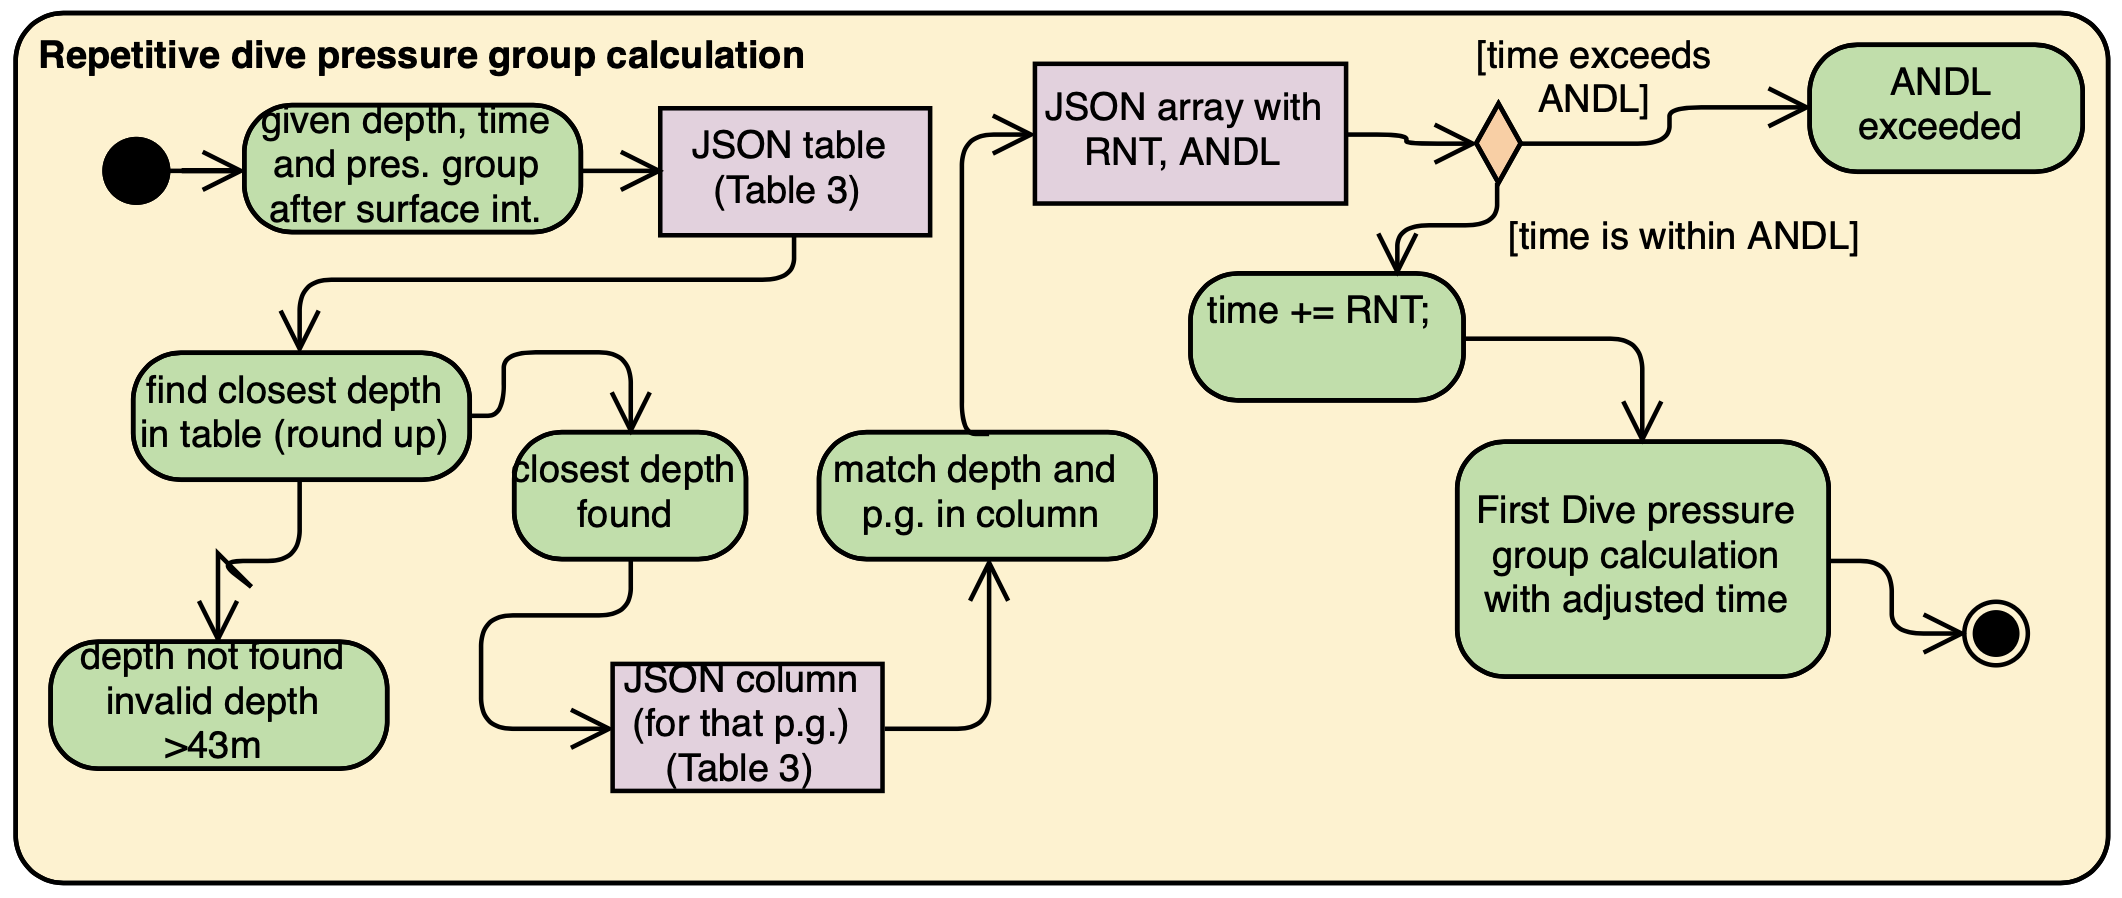
4.4.3. Calculating a repetitive dive end pressure group
For a repetitive dive, the divers would need to take note of the Adjusted no decompression limit (ANDL) at the depth they intend to dive at, by taking into account their residual nitrogen time (RNT) and adding it to their total bottom time - such that the dive remains a no decompression (recreational) dive. They would then run their new total bottom time with the intended depth through the first dive pressure group calculation, to get their new pressure group.
4.5. New Feature: Planning Mode (with portover capability)
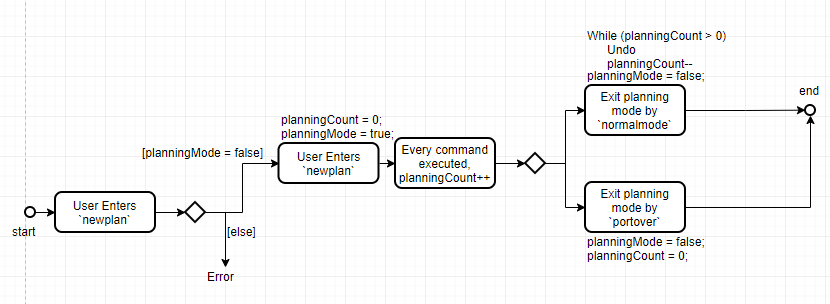
From our verbal surveys with test users and from our user stories, we have decided to implement a Planning mode in order for users to plan their dives ahead of their trips safely without worrying about corrupting their current data. Below shows the activity diagram of the planning mode.
4.5.1. Design Considerations
-
Alternative 1 (current choice): When in planning mode, a counter increments every time a command is called. In addition, there is now a state called planning mode, which shows true if in planning mode and false if in normal mode.
-
When the user chooses to exit and enter
normalmode, the underlying method calls for aundomethod and decreases the counter. This will repeat until the counter is zero, whereby then the state of the machine will change back to normal mode. -
If the user decides to call
portover, the counter is simply reset to 0 and the state of the machine is changed back to normal mode. -
Pros: Uses a method that is already present,
undo. This means there won’t be two implementations of the same method. -
Cons: The limitations of this method lie in its sole ability to handle
add,deleteandeditcommands in planning mode. Any other commands are not accepted.
-
-
Alternative 2: Create a temporary Stack to store commands instead of just a counter. The stack is created when user enters planning mode, and is destroyed after exiting planning mode.
-
Pros: All types of commands can now be used in planning mode, and not just
add,deleteandedit -
Cons: Extra implementations and considerations have to be taken into account. This might increase coupling between classes.
-
4.6. Sorting of data
We have considered that once a user has a considerable number of dives registered in the app, the user would potentially have difficulty finding dives,
even with the find function. (as many dives can have the same parameters such as location) To simplify the app usage, this command allows for users to decide the way
that the data shown to them is organised.
4.6.1. Design Considerations
-
Current implementation: A sort method with a time/date comparator is called every time a new dive is added, deleted or edited.
-
Potential improvement to the feature 1: Add a
sortbyCLI command, which decides how to sort the data by. Potential additional methods are sorting by Name (alphabetical) or Duration of Dive.
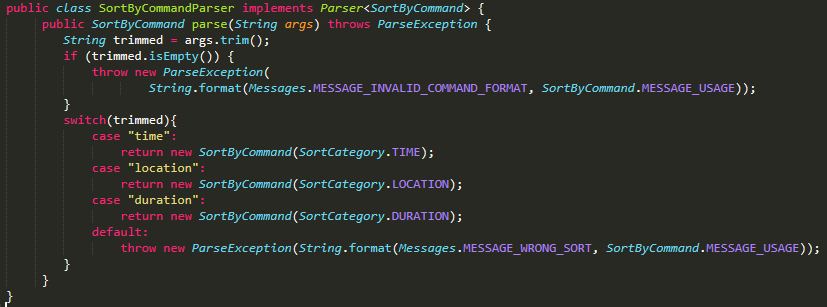

Optional: Create a enum with the parameters you want to sort the data by (E.g Time, Location and Duration)
Sample Enum
public enum SortCategory {
TIME, LOCATION, DURATION
}
Step 2: Create a sort method preferably in a separate utils class. This method should take in the parameter to sort by. (It will be easier and less prone to mistakes if Step 2 was used) The corresponding comparators should be created. The sort method should look something like b

Step 3: Ensure that the divelog refreshes / reflects the newly sorted. You can do this by calling for the sort method after every add or edit command. You can also create a new event in commons.events.
-
Pros: Once implemented, to increase the number of parameters / methods to sort the data by, simply create a new corresponding comparator, add the respective prefixes the parse for, and to increase the number of parameters included in the Enum file.
-
Cons: Can be troublesome to implement in the beginning.
Potential improvement to the feature 2: Reverse the current order by calling reverseorder
-
Method to implement: Simply reverse the comparator in the sorting methods, where comparators are stored in a sample method shown in Figure 12. (above)
-
Pros: Improved usability and thus better UX.
-
Cons: Increased difficulty to maintain as the
4.7. New Parameters & conditions in a DiveSession
4.7.1. Timezone
Considering that users would dive in many different parts of the world, we have taken the effort to implement a Timezone parameter to ease users in adding new dives into the Dive Log without the need to convert any time to Local time.
We have decided to utilise the format of UTC, given its universal usage around the world. The UTC timezones range from -12 to +12, including 0. Singapore lies in the timezone of UTC+8.
-
Alternative 1 (current choice): When calculating Pressure Groups using TimeZone, all time is converted to UTC time before calculating duration, and subsequently pressure groups and its resultant results.
-
Pros: There is no confusion of timezones when doing complex calculations.
-
Cons: There is a need to convert time from UTC time back to local time. If not taken care of, inaccurate times may be shown.
-
-
Alternative 2: Adopt Java SE 9’s java.time library
-
Pros: There are pre-built algorithms and methods in the library.
-
Cons: Takes time to learn and to adopt the methods, which might not be efficient for our light usage.
-
4.7.2. Time and OurDate
Time and OurDate are 2 of the new parameters in the Dive Log. In order to be able to calculate the Pressure Groups automatically, there has to be a time and date parameter. We have decided to create our own class.
-
Alternative 1 (current choice): Use a 4 length String to contain time and 8 length String to contain date.
-
Pros: When reading in data from the
ArgumentMultimap, it requires very little effort in parsing. Also, the use of String allows for versatile typecasting into long, int, or Java SE 7’s SimpleDateFormat. Similarly, the use of String and long as main type allows for better versatility among different methods. -
Cons: Data needs to be parsed into Java SE 8’s java.date and Java SE 7’s SimpleDateFormat in order to calculate time differences. This means that there can potentially be many type conflicts. However, this problem is contained in a helper class
CompareUtilswhich handles methods likecheckTimeDifference(returns the difference between 2 given time and date),getLocalDate(gets the local date and time),convertTimeToUtc(converts given date into UTC timing) andconvertTimeToLocal(converts a date into Local time and date).
-
-
Alternative 2: Adopt Java SE 9’s java.time library
-
Pros: More volatile as the library contains many ready-made solutions. Also, java.time also allows for the easy implementation of local time, which is one of our improvements made to AB4.
-
Cons: Takes time to learn and to adopt the methods, which might not be efficient for our light usage. Also, it will only be compatible with Java SE 9.
-
4.8. Localized Units
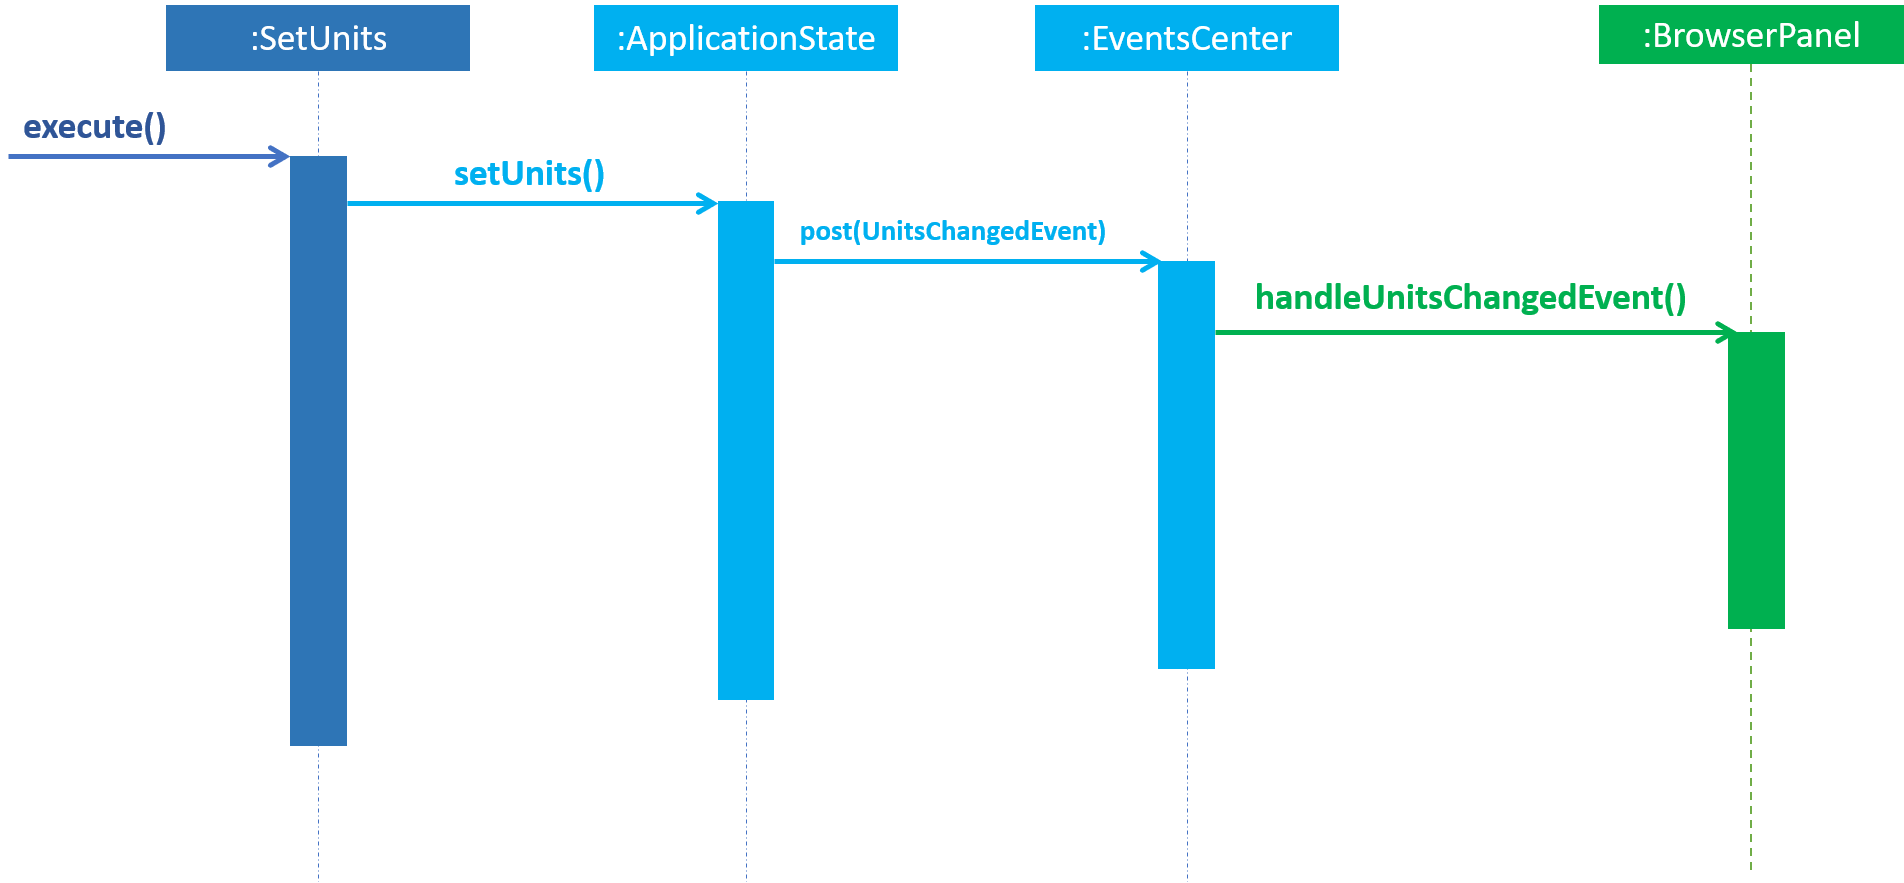
As of v1.3, a set_units command was added. This allows the user to switch between meters and feet.
As shown in the diagram below, the implementation of this command involves altering the ApplicationState singleton. Once the ApplicationState
is updated a UnitsChangedEvent is posted to the EventsCenter. The EventsCenter issues a
call to the UI. The relevant parts of the UI will be forced to re-render themselves to match
the new units.
As of v1.4 the ParserUtil#parseDepthProfile(String depth) also reads this state, and converts the units to meters.
Internally all the units are stored as meters. This choice was largely made to keep things simple. The
ApplicationState also exposes a function to get the current units setting.
4.9. Colour coding of the Pressure Groups
Through engagement with our test users and from our user stories, the pressure group needed to be obvious and easy to reference to
our users, which meant that it had to stand out on the display. These pressure group would let the divers know if their dives was
safe and how much leeway they might have in the water. As such, the BrowserPanel takes into the account the pressure groups that
are supposed to be returned and adds colour to it.
4.9.1. Design Considerations
-
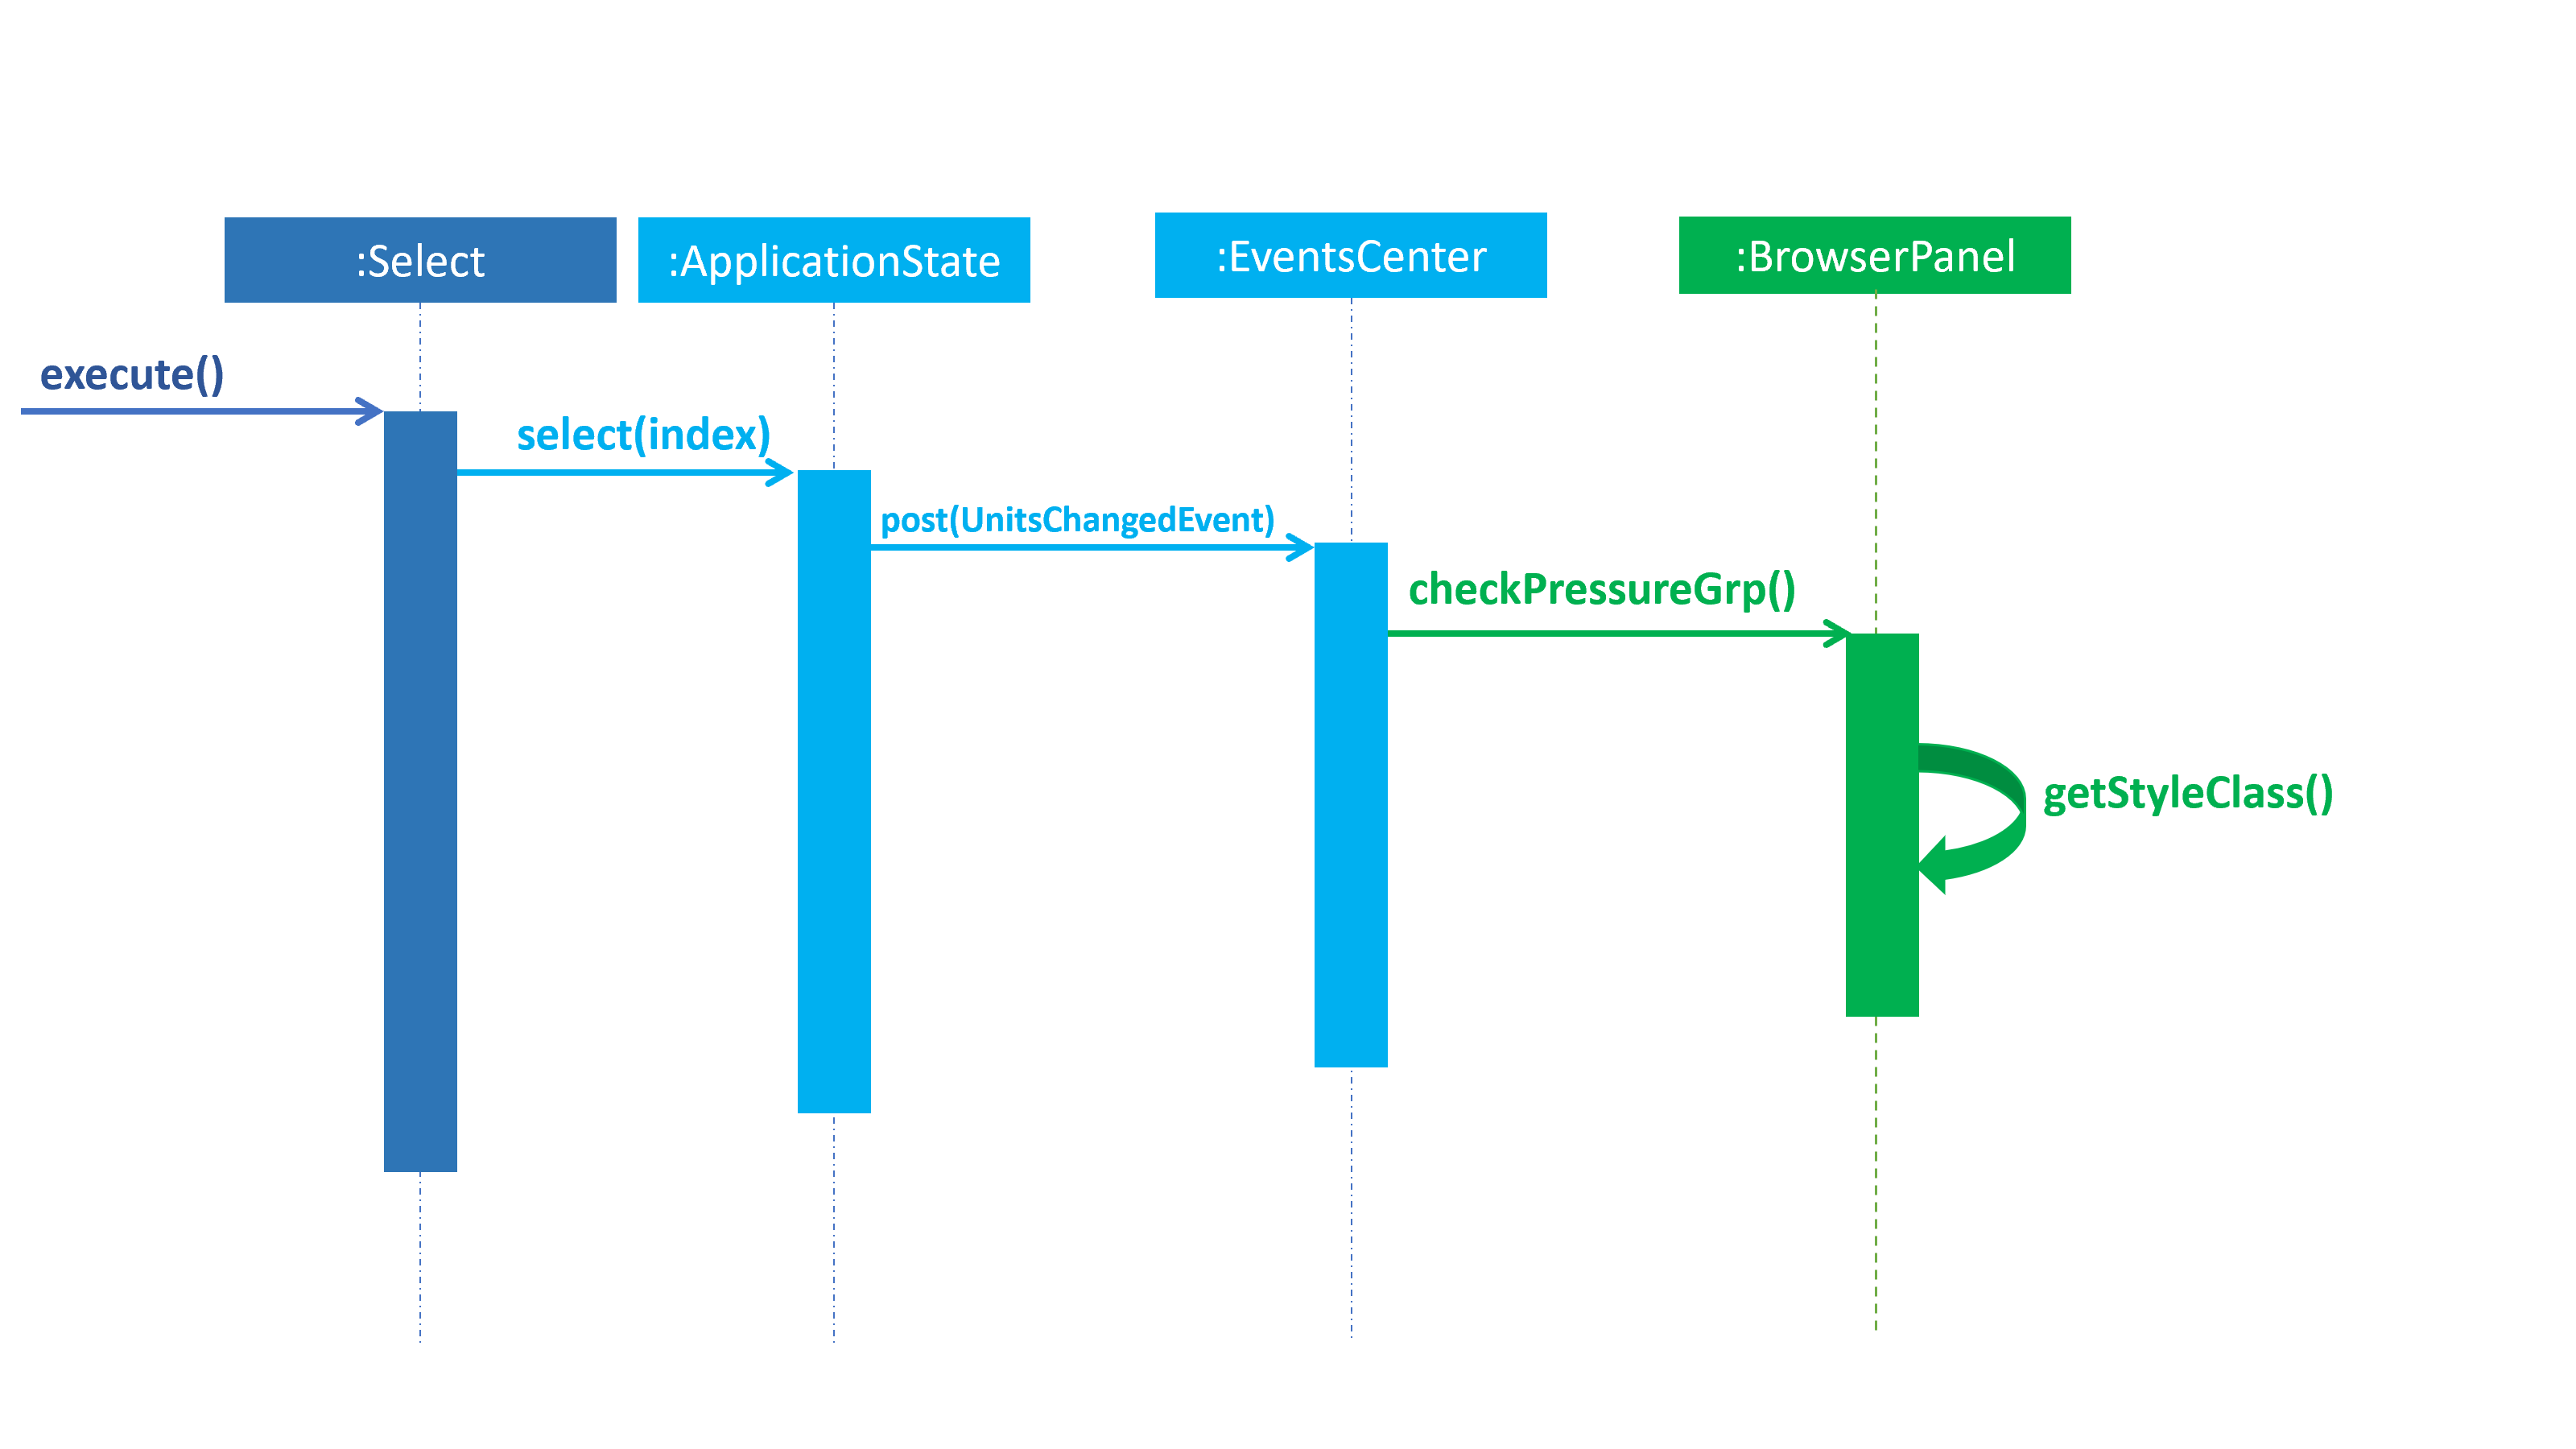
Current implementation: When the pressure group returned the the
BrowserPanelfor display to the user, the colour is changed by changing its CSS style. The colour is chosen from green [#0FFF0F] to yellow [#F5FF07] to red [#FF0000]. The colour are in order of normal to moderate and finally, dangerous amount of nitrogen in the blood of the user or their pressure group. The colours are seen in the Figure 14 below. As seen in the implementation below (Figure 15), once theApplication Stateis updated, aselectChangedEventis posted to theEventsCenter. TheEventsCenterthen issues a call to check thecheckPressureGrp()to theBrowserPaneland updates the CSS of the pressure group. It will then re-render the UI to reflect the new CSS throughgetStyleClass().-
Pros: The pressure group is clearly distinguished by its severity at one glance.
-
Cons: Not all may be able to use it. For example, users who may be colour-blind.
-

-
Alternative implementation: Instead of changing the colour, the text font maybe increased in proportion to the severity of the pressure group.
-
Pros: Most people would be able to see it. If the text is very big, the warning regarding its severity will be obvious.
-
Cons: May make the UI and screen messy. Will need to have a comparision chart to compare the size to.
-
-
Potential Improvements: The current implementation could be combined with the alternative implementation, to make the emphasis on the pressure group being severe. For example, the pressure group could be in the red zone (dangerous/severe zone) and the text font would be increased.
-
Pros: Makes it even clearer, especially if the pressure group is at dangerous levels. Allows more users to potentially benefit from it.
-
Cons: If not properly implemented, it might end up making the UI messy.
-
4.10. Logging
We are using java.util.logging package for logging. The LogsCenter class is used to manage the logging levels and logging destinations.
-
The logging level can be controlled using the
logLevelsetting in the configuration file (See Section 4.11, “Configuration”) -
The
Loggerfor a class can be obtained usingLogsCenter.getLogger(Class)which will log messages according to the specified logging level -
Currently log messages are output through:
Consoleand to a.logfile.
Logging Levels
-
SEVERE: Critical problem detected which may possibly cause the termination of the application -
WARNING: Can continue, but with caution -
INFO: Information showing the noteworthy actions by the App -
FINE: Details that is not usually noteworthy but may be useful in debugging e.g. print the actual list instead of just its size
4.11. Configuration
Certain properties of the application can be controlled (e.g. App name, logging level) through the configuration file (default: config.json).
5. Documentation
We use asciidoc for writing documentation.
| We chose asciidoc over Markdown because asciidoc, although a bit more complex than Markdown, provides more flexibility in formatting. |
5.1. Editing Documentation
See UsingGradle.adoc to learn how to render .adoc files locally to preview the end result of your edits.
Alternatively, you can download the AsciiDoc plugin for IntelliJ, which allows you to preview the changes you have made to your .adoc files in real-time.
5.2. Publishing Documentation
See UsingTravis.adoc to learn how to deploy GitHub Pages using Travis.
5.3. Converting Documentation to PDF format
We use Google Chrome for converting documentation to PDF format, as Chrome’s PDF engine preserves hyperlinks used in webpages.
Here are the steps to convert the project documentation files to PDF format.
-
Follow the instructions in UsingGradle.adoc to convert the AsciiDoc files in the
docs/directory to HTML format. -
Go to your generated HTML files in the
build/docsfolder, right click on them and selectOpen with→Google Chrome. -
Within Chrome, click on the
Printoption in Chrome’s menu. -
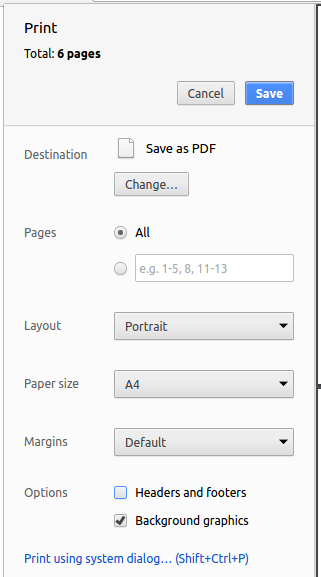
Set the destination to
Save as PDF, then clickSaveto save a copy of the file in PDF format. For best results, use the settings indicated in the screenshot below.
5.4. Site-wide Documentation Settings
The build.gradle file specifies some project-specific asciidoc attributes which affects how all documentation files within this project are rendered.
Attributes left unset in the build.gradle file will use their default value, if any.
|
| Attribute name | Description | Default value |
|---|---|---|
|
The name of the website. If set, the name will be displayed near the top of the page. |
not set |
|
URL to the site’s repository on GitHub. Setting this will add a "View on GitHub" link in the navigation bar. |
not set |
|
Define this attribute if the project is an official SE-EDU project. This will render the SE-EDU navigation bar at the top of the page, and add some SE-EDU-specific navigation items. |
not set |
5.5. Per-file Documentation Settings
Each .adoc file may also specify some file-specific asciidoc attributes which affects how the file is rendered.
Asciidoctor’s built-in attributes may be specified and used as well.
Attributes left unset in .adoc files will use their default value, if any.
|
| Attribute name | Description | Default value |
|---|---|---|
|
Site section that the document belongs to.
This will cause the associated item in the navigation bar to be highlighted.
One of: * Official SE-EDU projects only |
not set |
|
Set this attribute to remove the site navigation bar. |
not set |
5.6. Site Template
The files in docs/stylesheets are the CSS stylesheets of the site.
You can modify them to change some properties of the site’s design.
The files in docs/templates controls the rendering of .adoc files into HTML5.
These template files are written in a mixture of Ruby and Slim.
|
Modifying the template files in |
6. Testing
6.1. Running Tests
There are three ways to run tests.
| The most reliable way to run tests is the 3rd one. The first two methods might fail some GUI tests due to platform/resolution-specific idiosyncrasies. |
Method 1: Using IntelliJ JUnit test runner
-
To run all tests, right-click on the
src/test/javafolder and chooseRun 'All Tests' -
To run a subset of tests, you can right-click on a test package, test class, or a test and choose
Run 'ABC'
Method 2: Using Gradle
-
Open a console and run the command
gradlew clean allTests(Mac/Linux:./gradlew clean allTests)
| See UsingGradle.adoc for more info on how to run tests using Gradle. |
Method 3: Using Gradle (headless)
Thanks to the TestFX library we use, our GUI tests can be run in the headless mode. In the headless mode, GUI tests do not show up on the screen. That means the developer can do other things on the Computer while the tests are running.
To run tests in headless mode, open a console and run the command gradlew clean headless allTests (Mac/Linux: ./gradlew clean headless allTests)
6.2. Types of tests
We have two types of tests:
-
GUI Tests - These are tests involving the GUI. They include,
-
System Tests that test the entire App by simulating user actions on the GUI. These are in the
systemtestspackage. -
Unit tests that test the individual components. These are in
seedu.divelog.uipackage.
-
-
Non-GUI Tests - These are tests not involving the GUI. They include,
-
Unit tests targeting the lowest level methods/classes.
e.g.seedu.divelog.commons.StringUtilTest -
Integration tests that are checking the integration of multiple code units (those code units are assumed to be working).
e.g.seedu.divelog.storage.StorageManagerTest -
Hybrids of unit and integration tests. These test are checking multiple code units as well as how the are connected together.
e.g.seedu.divelog.logic.LogicManagerTest
-
6.3. Troubleshooting Testing
Problem: HelpWindowTest fails with a NullPointerException.
-
Reason: One of its dependencies,
HelpWindow.htmlinsrc/main/resources/docsis missing. -
Solution: Execute Gradle task
processResources.
7. Dev Ops
7.1. Build Automation
See UsingGradle.adoc to learn how to use Gradle for build automation.
7.2. Continuous Integration
We use Travis CI to perform Continuous Integration on our projects. See UsingTravis.adoc and UsingAppVeyor.adoc for more details.
7.3. Making a Release
Here are the steps to create a new release.
-
Update the version number in
MainApp.java. -
Generate a JAR file using Gradle.
-
Tag the repo with the version number. e.g.
v0.1 -
Create a new release using GitHub and upload the JAR file you created.
7.4. Managing Dependencies
A project often depends on third-party libraries. For example, Address Book depends on the Jackson library for XML parsing. Managing these dependencies can be automated using Gradle. For example, Gradle can download the dependencies automatically, which is better than these alternatives.
a. Include those libraries in the repo (this bloats the repo size)
b. Require developers to download those libraries manually (this creates extra work for developers)
Appendix A: Product Scope
Target user profile:
-
Is a beginner Diver
-
Goes diving frequently.
-
Has the need to keep track of Nitrogen Levels so that he/she does not end up needing to undergo decompression.
Value proposition: An automated desktop app to keep track of nitrogen levels for divers.
Appendix B: User Stories
Priorities: High (must have) - * * *, Medium (nice to have) - * *, Low (unlikely to have) - *, Null (Not Implementing) - -
| Priority | As a… | I want to… | So that I can… |
|---|---|---|---|
|
Diver |
Know my current pressure group |
Plan my next dive safely |
|
Diver |
Add dive entries |
So that I can know my pressure group. |
|
Diver |
Be able to enter data in local time |
Save time when calculating my pressure groups. |
|
Diver |
Plan my dives ahead of performing them |
So that I know what a safe limit is. |
|
Diver |
to see where I have been |
Reminisce |
|
Dive master |
Check my dive buddy’s logs |
Make sure all of us have a safe trip |
Appendix C: Use Cases
(For all use cases below, the System is the Dive Log Application and the Actor is the user, unless specified otherwise)
Use case: Add dive session
MSS
-
Diver opens system
-
System shows him a list of dive sessions
-
Diver chooses to add a new dive session
-
System returns and requests for data from Diver
-
Diver adds time spent at different depths, marine species diver has seen
-
System confirms the details
-
Diver confirms the details
-
System adds the dive session and shows it is successful
-
Diver confirms
-
System shows recommended time to next dive or flight
Use case ends.
Extensions
-
3a. The data entered is invalid. (i.e. The diver enters text instead of numeric values for depth.)
-
3a1. System points to the invalid data and asks user to clarify data.
Use case resumes at step 3.
-
Use case: View details of a dive session
MSS
-
Diver opens system
-
System shows him a list of dive sessions
-
Diver selects dive session to view details of the dive session
-
System returns the dive session details
Use case: Edit a dive session
MSS
-
Diver opens system
-
System shows him a list of dive sessions
-
Diver selects dive session to edit
-
System returns the parameters of the specific dive session
-
Diver enters the new information of that dive session
-
System confirms the edit of that dive session.
Extensions
-
5a. The data entered is invalid. (i.e. The diver enters text instead of numeric values for depth.)
-
5a1. System points to the invalid data entered and asks user to clarify data.
Use case resumes at step 5.
-
-
7b. The user realizes the input is invalid. He enters undo.
-
7b1. System rolls back the last edit.
-
C.1. Use case: Remove a dive session
MSS
-
Diver opens system
-
System shows him a list of dive sessions
-
Diver selects the dive session to remove
-
System confirms the deletion
-
Diver confirms.
-
System removes dive session.
Extensions
-
5a. Diver cancels.
-
5a1. System does not make any changes to current state.
Use case ends here.
-
C.2. Use case: Check current pressure group
MSS
-
Diver opens system
-
System shows him a list of dive sessions
-
Diver requests system for his current pressure group
-
System displays his current pressure group, the time needed to the next pressure group, and the time needed for him to reach his desired pressure group as well as the recommended time to his next dive or flight.
Appendix D: Non Functional Requirements
-
Should work on any mainstream OS as long as it has Java
9or higher installed. -
Should be able to hold up to 1000 dive sessions without a noticeable sluggishness in performance for typical usage.
-
Should allow users to select and view dives in addition to the command line.
-
Should be able to calculate the pressure groups as specified by PADI’s dive table.
-
Should have a simple tutorial walk through to orientate the users if it is their first time running the application
Appendix F: Product Survey
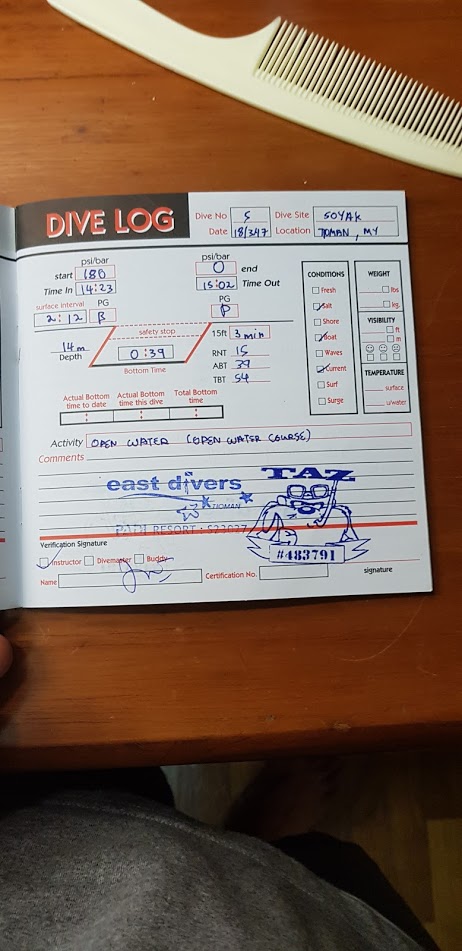
A few similar products exist out there. Firstly, one of the team members (Arjo) uses a paper equivalent of such a dive log. This dive log records all the necessary information and provides a user with the basic safety information of the PG being provided as fields. However, the pressure group information must be hand calculated leading to error or negligence.
Linus Torvalds, the benevolent dictator of the linux kernel and mastermind behind git has also created a dive log program. Linus’s program, known as Subsurface, is written in C++ and uses the Qt library allowing for cross-platform usage.
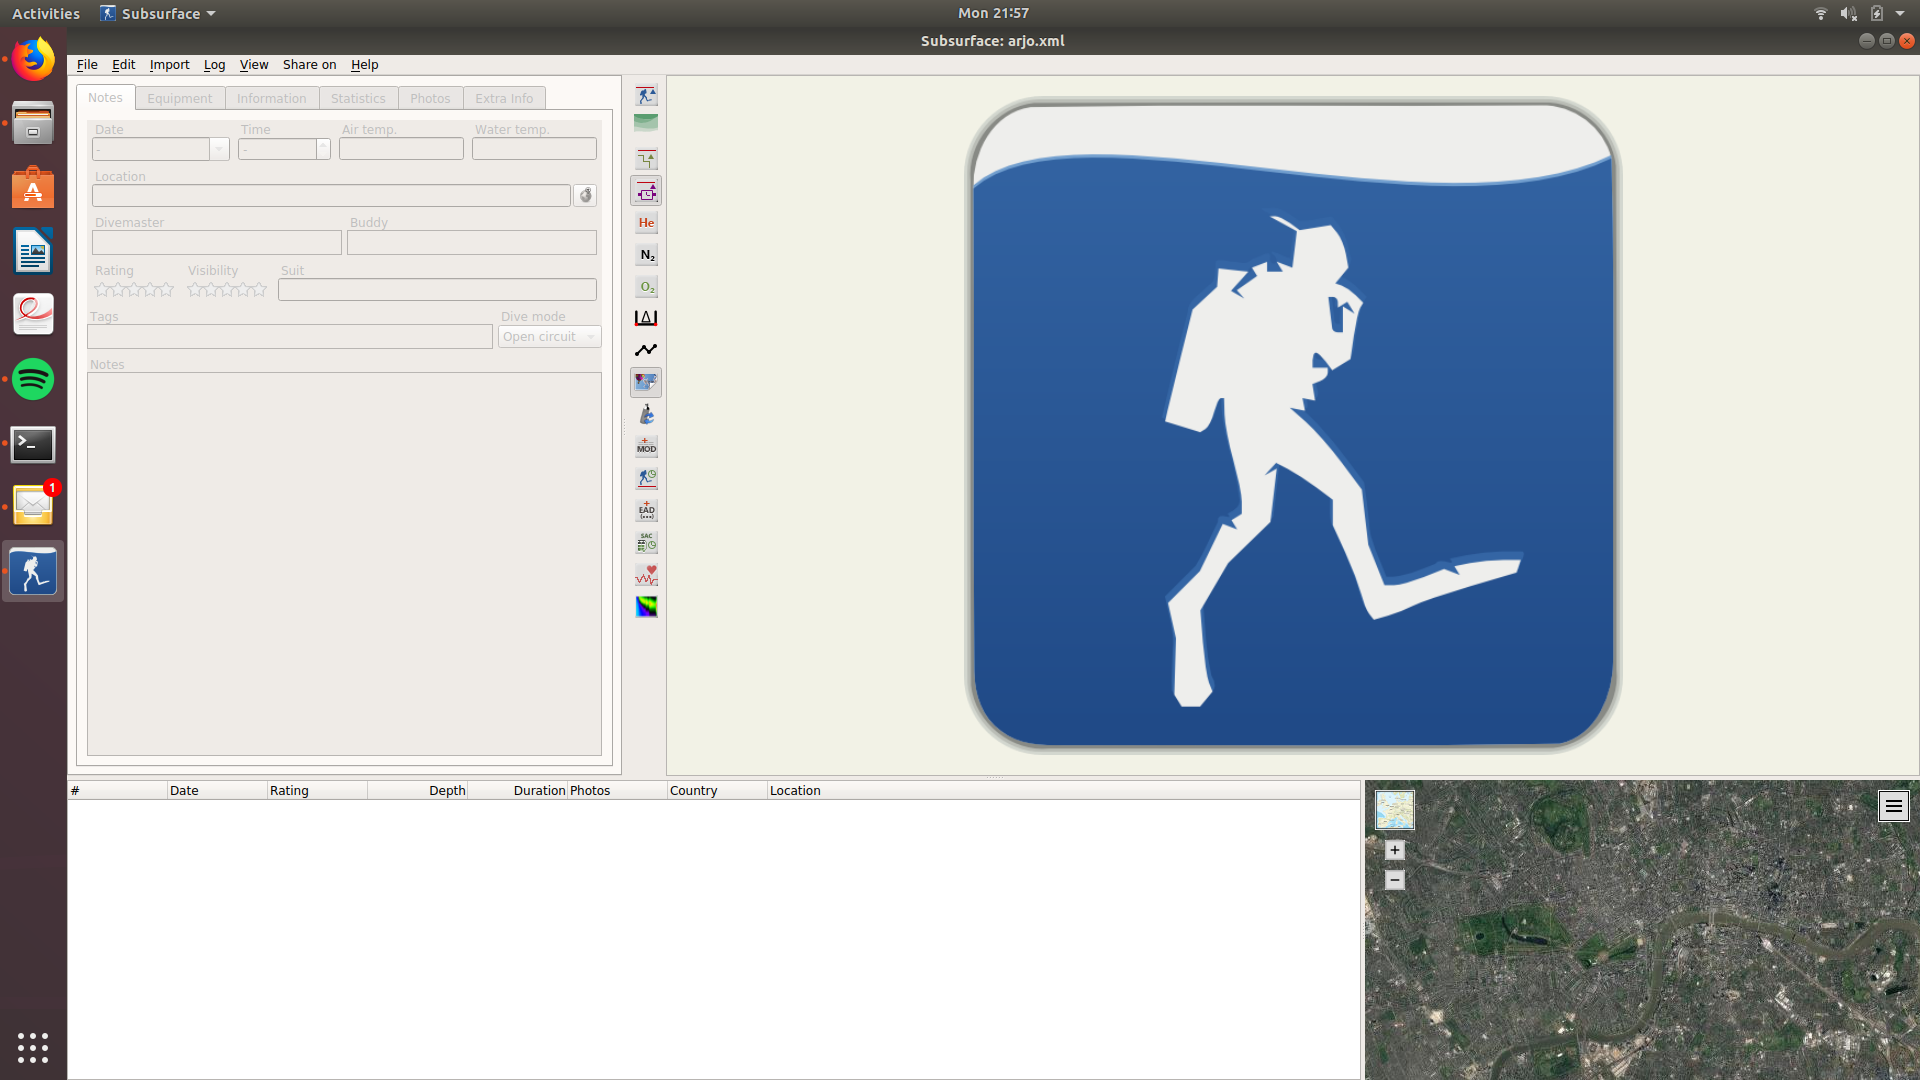
Subsurface has a comprehensive interface for entering a lot of details. It allows the user to enter things such as the depth, who the dive master was, dive buddy’s name and equipment. It also has a nice satellite map to show where you are planning the dive. The plot on the right hand side illustrates the depth. This includes the so called “safety stop” where the diver allows some of the nitrogen to be released from his bloodstream before surfacing. The plot also is capable of showing a nitrogen profile and a rough estimate of how much oxygen should be kept in reserve for each part of the dive. All of this make it a very complete product with the exception that its initial learning curve is fairly steep.

When the user first opens the dive log he or she is greeted with this screen, which is not very indicative of what exactly is going on. It takes the user a few attempts to figure out how to add a dive as the add dive is nested very deep inside the menu. It also does not display the pressure group anywhere. This can be confusing for beginner divers as they rely on pressure groups to ensure their own safety.
Appendix G: Instructions for Manual Testing
Given below are instructions to test the app manually.
| These instructions only provide a starting point for testers to work on; testers are expected to do more exploratory testing. |
G.1. Launch and Shutdown
-
Initial launch
-
Download the jar file and copy into an empty folder
-
Double-click the jar file
Expected: Shows the GUI with a set of sample dives. The window size may not be optimum.
-
G.2. A few things to note about dives
The aim of this app is to make nitrogen level calculations of a diver very natural. As such testing the app requires certain understanding about dives. The user guide outlines the conditions under which dives may be rejected from being added to the system.
G.3. Deleting a diveSession
-
Deleting a diveSession while all dives are listed
-
Prerequisites: List all dives using the
listcommand. Multiple dives in the list. -
Test case:
delete 1
Expected: First dive session is deleted from the list. Details of the deleted dive session shown in the status message. Timestamp in the status bar is updated. -
Test case:
delete 0
Expected: No diveSession is deleted. Error details shown in the status message. Status bar remains the same. -
Other incorrect delete commands to try:
delete,delete x(where x is larger than the list size) {give more}
Expected: Similar to previous.
-
G.4. Saving data
-
Dealing with missing/corrupted data files
-
Data is stored in the
data/subdirectory of the current working directory. -
Corrupted data will cause the application to overwrite the file.
-